A Template for Children's Book Layout, Pagination & Design
Contents
When it comes to children's picture books, the way a book looks is almost as important as the words on the page. Why? Because most children who read picture books can't actually read. Instead, they rely on someone else to read to them. What children can do is look at the pages of a book, whether with an adult or alone. They can use the visual cues provided to make sense of the story. But in order for them to do so effectively, a picture book must have a good layout.
What is children's book layout?
Children's book layout is the way in which text and illustrations fit on each page of children's book. When writing a picture book, it is critical to remember that illustrations are not secondary to the text—they are equal to the text. The truth of any great picture book is that neither the text nor the illustrations alone can tell the whole story. The two must complement one another, each offering a piece of the story that the other does not. Picture books are intended for readers who rely on illustrations to aid in story comprehension. These illustrations help children contextualize text by giving visual cues to the meaning of the words on a page.
Perhaps one of the greatest mistakes a beginning author can make is assuming that decisions about text and illustration placement happens after art has been created. Not so! In fact, to hold off on thinking about children's book layout until after illustrations are done is one of the surest ways to end up with a book that does not achieve its goals. Placement of illustrations and text must be properly thought out and planned, and this plan should begin the moment a manuscript is written. This is the purpose of a children's book layout, and it is one of an author's most valuable tools.
Pro Tip: While less impactful to the overall reading experience, children's book layout is still important to conisder when writing chapter books with art. When writing, give careful consideration to what scenes might be illustrated and how much space the illustrations will take up on the page.
What are the elements of children's book layout?
When planning a children's book layout, it is essential to take into account page count, book trim size, book end sheets, front matter, story pacing, and page turns. It is also important to know whether you plan to print a book through a traditional offset printer or through a print on demand service, as the method of printing impacts both page count and book end sheets.
 Related articleChildren's Book Printers: The Children's Book Printing BibleThe essential guide to hardcover children's book printing, offset book printing and a vetted list of children's book printers for hardcover book printing.Read the article →
Picture book page count
The standard picture book page count is 32 pages. Almost all picture books put out by children's book publishers are 32 pages, but there are exceptions. Picture books can also be 24 pages, 40 pages, and 48 pages. Although it’s a good idea to stick to traditional page counts (after all, that’s what readers are used to!), if you plan to self-publish, you do have more freedom.
 Related articleWhat Is a Picture Book and What Makes a Great Picture Book!A detailed guide to the definition of a picture book, including the types of picture books and the elements of a picture book for aspiring authors.Read the article →
Pro Tip: Early reader books are 32 pages long. This is a publishing industry standard. Early readers don't have the same wiggle room on page count as picture books. The few exceptions are level 3 early readers and higher, which may extend to 48 pages.
 Related articleLeveled Readers: Early Reader Books for Emergent ReadersA guide to early reader books for emergent readers, Lexile Leveling and Guided Reader Leveling, and a list of the best early reader books for beginning readers.Read the article →
How does on demand printing impact page count?
The two biggest self-publishing companies are Amazon KDP and IngramSpark. IngramSpark requires minimum page count of 16 pages; that page count must be divisible by 2. Amazon KDP requires a minimum page count of 24 pages for a paperback book, and 76 pages for a hardcover book. Page counts must be divisible by 4 through Amazon KDP.
Pro Tip: Both IngramSpark and Amazon KDP page counts include a blank page at the back of the book for their barcode. The barcode page is included in the book's final page count. If their barcode page is added to a 32-page book, the result will be extra blank pages to adjust the final page count to one divisible by the appropriate number. To avoid having extra blank pages at the end of the book, plan to end your book one page short! Instead of sending in a 32-page book, submit a 31-page book. The added page for the company’s printing information will fill in your last page, leaving you with no blanks and a book that looks well-planned out!
 Related articleWhat Are the Best Print on Demand Book Services?A guide to the best book printing services for print on demand books, including the pros and cons of Amazon print on demand, IngramSpark, Blurb, BookBaby, & Lulu xPress.Read the article →
Picture book layout
Before diving into picture book layout, an author first must understand how books are constructed and the differences in construction between a paperback and hardcover book. Moreover, for a hardcover book, it is important to understand book end sheets and the difference between a self-ended book and a book with separate ends.
What is a book signature?
A book signature is a single sheet of paper that is printed, folded, and cut to create the pages of your book. The minimum number of pages created when the paper is cut is four pages, but a standard signature is 16 pages. Below is an example of what a book signature looks like when it is printed. Notice that some of the pages are upside down and out of order. This is because of the way the pages are folded and cut.
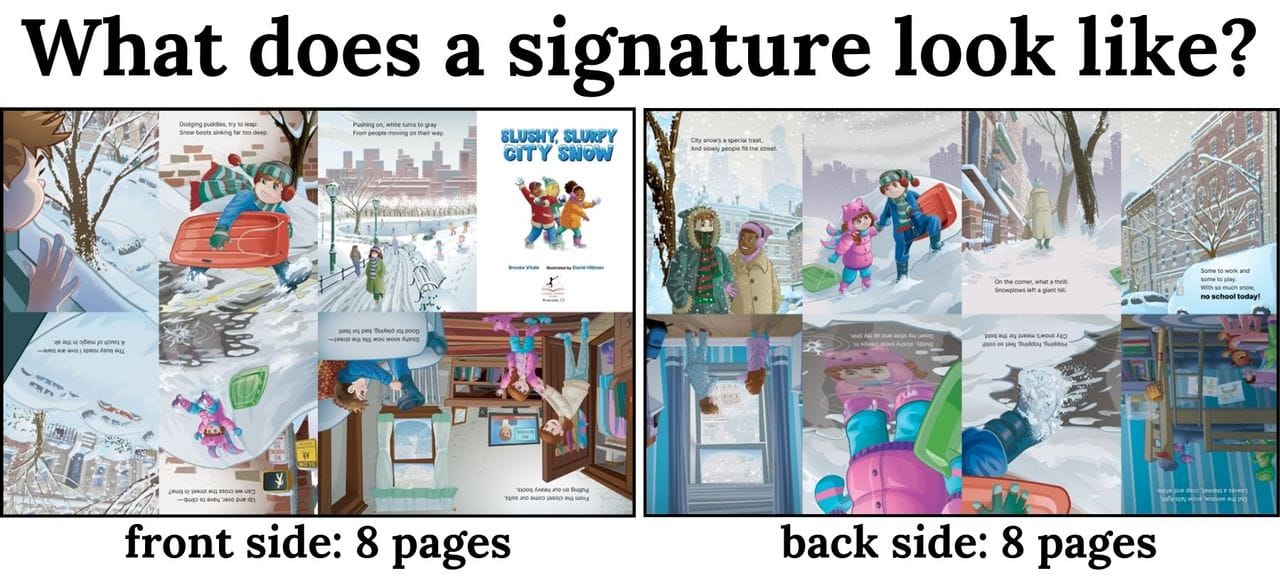
Each of the signatures that make up your book are then bound together to form what’s called your book block. The book block is the entire interior portion of your book, not counting book end sheets on a hardcover book with separate ends. Front matter, back matter, and the body of the book are all included in the book block.
In a traditional publishing company, books are only printed in page counts that are a multiple of 16 (hence the traditional 32-page picture book). If you look at longer novels, you’ll find that they either have page counts that perfectly reach a multiple of 16 (256, 272, 288), they end with some marketing material, or there are multiple blank pages at the end. That’s because they are trying to achieve the right page count.
But why does page count really matter? Because choosing a page count that is a mulitple of 16 is the most cost-efficient way to print a book. While printers can—and do—print books in page counts that are instead a multiple of 4 or 8, doing so wastes paper. As an author, you are still paying for a full sheet of paper regardless of whether you print on it or not. Creating an efficient children's book layout will result in the most cost efficient option for book printing.
Book page numbering
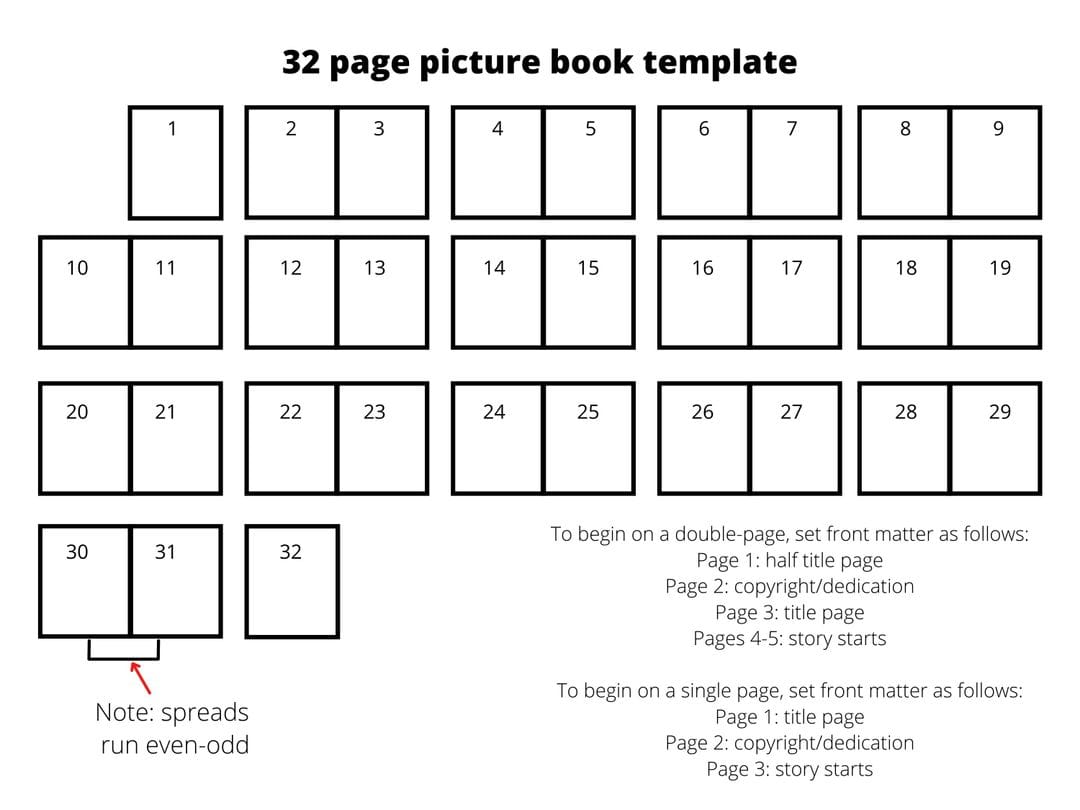
It seems obvious to say that a picture book starts on page 1, but what may not be so obvious is where page 1 goes. Books print in spreads that go even-odd, so pages 2–3, 4–5, and so on. The first page of a book is actually the right-hand side when you open the book, and the last page of the book will fall on the left. In book publishing, right hand pages are called recto pages, and left hand pages are called verso pages.
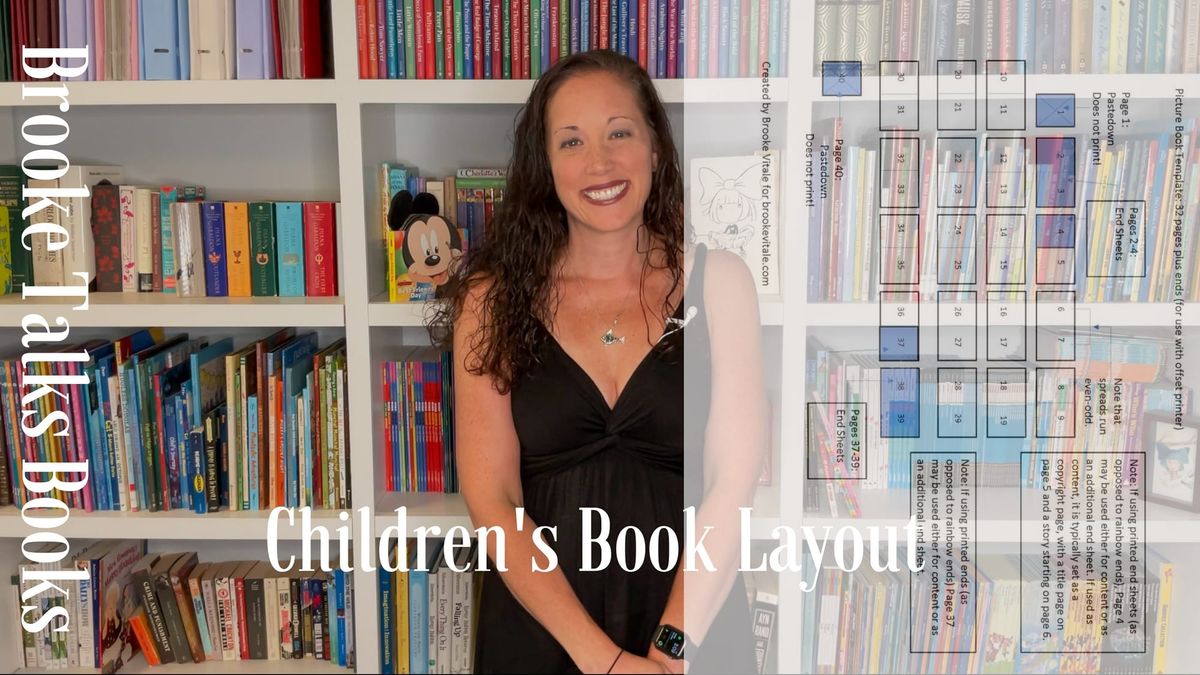
Below is a sample 32 page picture book template for a paperback book. This shows how pages are numbered, and where two page spreads fall in a book. Remember, paperback books do not include end papers, so everything that falls between the front and back cover is the book block, and every one of those pages is part of your picture book layout.
Pro Tip: In a picture book, pages are not actually numbered. Page numbering is fine for book planning and is encouraged at the book template stage, but page numbers should be removed from the final product.
Hardcover children's book templates
What are end pages?
Hardcover book end sheets, or book endpapers, are the pieces of paper that hold the hardcover book cover to the interior pages. The reason a hardcover book needs end pages is that a book block is often too heavy to glue straight to the cover. Book end sheets are usually a thicker stock that provide added stability to the structure of the hardcover book.
Book end sheets consist of 8 pieces of paper that get sewn to and around the book block. Of these eight pages, 4 go at the front of a book and 4 go at the back. The first page of the end sheets and the last page of the end sheets are then glued to the book cover. These pages are called pastedown, because they are literally "pasted down" and cannot be seen when a book is opened.
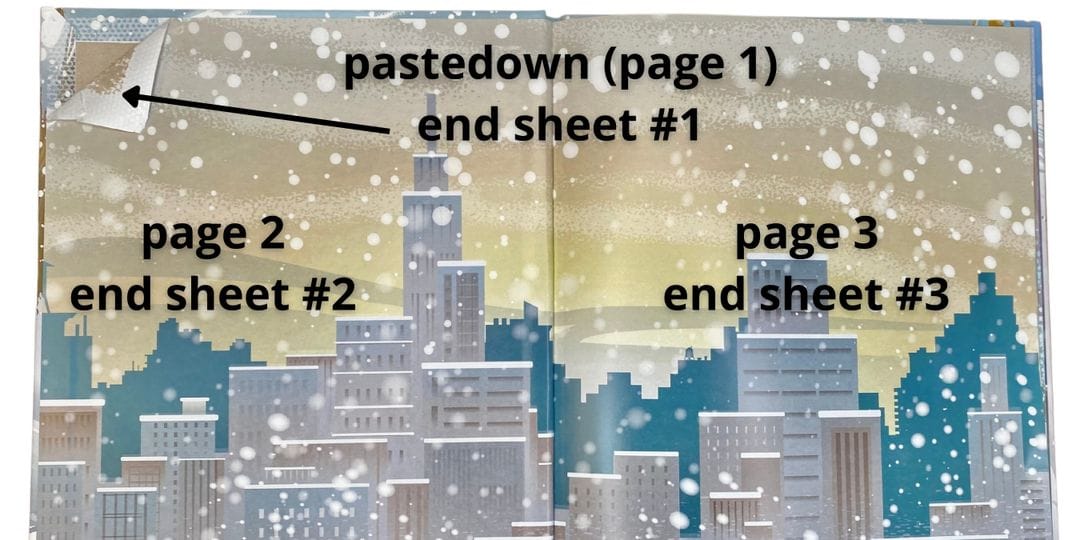
Remember when creating a children's book layout that end pages are only used on hardcover books, as paperback covers get glued or sewn directly to the book block.
 Related articleHardcover Book End Sheets and How End Pages Impact Book LayoutBook end sheets, or book endpapers, are the end pages that hold the cover of a hardcover book to the interior pages. They are the first thing a reader sees when they open a book cover and can add an extra level of luxuriousness to a book. But what are book end pages, and when it comes to adding them to a book, what are the options?Read the article →
What is a self-ended book?
Not every children's book has 32 pages of content. Sometimes a book runs a bit short. At other times, an author may find that they need 36 pages to do a book justice. This is where a self-ended book comes in.
A self-ended book does not contain separate, thicker end pages. Instead, it uses part of the book block as the end pages. A 32-page self-ended book would use pages 1 and 32 as the book's pastedown pages.
With two of the pages glued down, you are left with only 30 pages (pages 2-31) for book content. Below is a sample 32 page children's book layout template for a self-ended book. Because page 1 is pasted down, the book opens to a full spread, not a single page on the right.
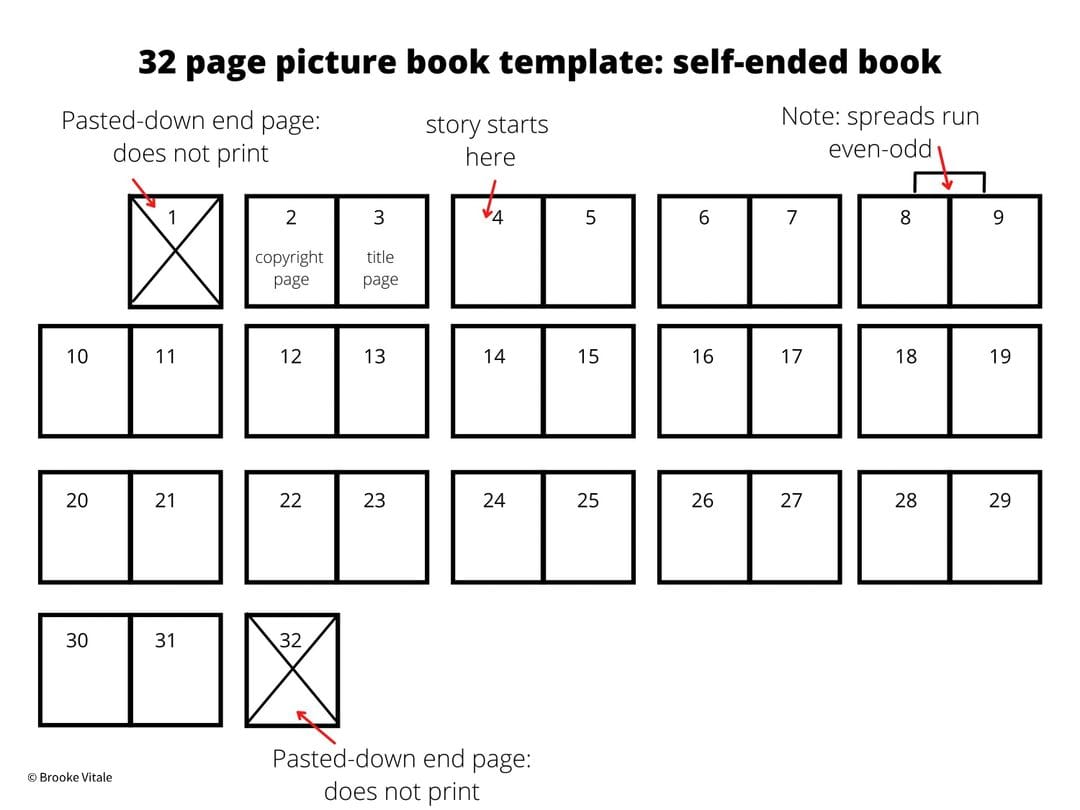
Note, in this 32 page picture book template, the book content begins on page 2. The 32 pages do not include designed end sheets, meaning that page 2 is the copyright page, page 3 is the title page, and the story starts on page 4.
Whether or not to include designed end pages is up the author. The 30 pages available to be printed on may be used however the author sees fit, whether that means jumping directly into a story, or adding designed end pages around a shorter story. For each designed end page added to a 32 page self-ended children's book layout, one page of content will be lost.
When working with self-ended books, it is important to know that a 32-page book is not the only option. As an author, I prefer to print a 40-page self-ended book. This allows me to include three pages of printed ends at both the front and the back of the book, while still leaving room for a full 32-page picture book. The effect is a book that looks the same as one printed with separate ends, but at a lower cost to print. Creating a 40-page self-ended book also allows me to convert to a perfect 32-page paperback book without having to make any design changes.
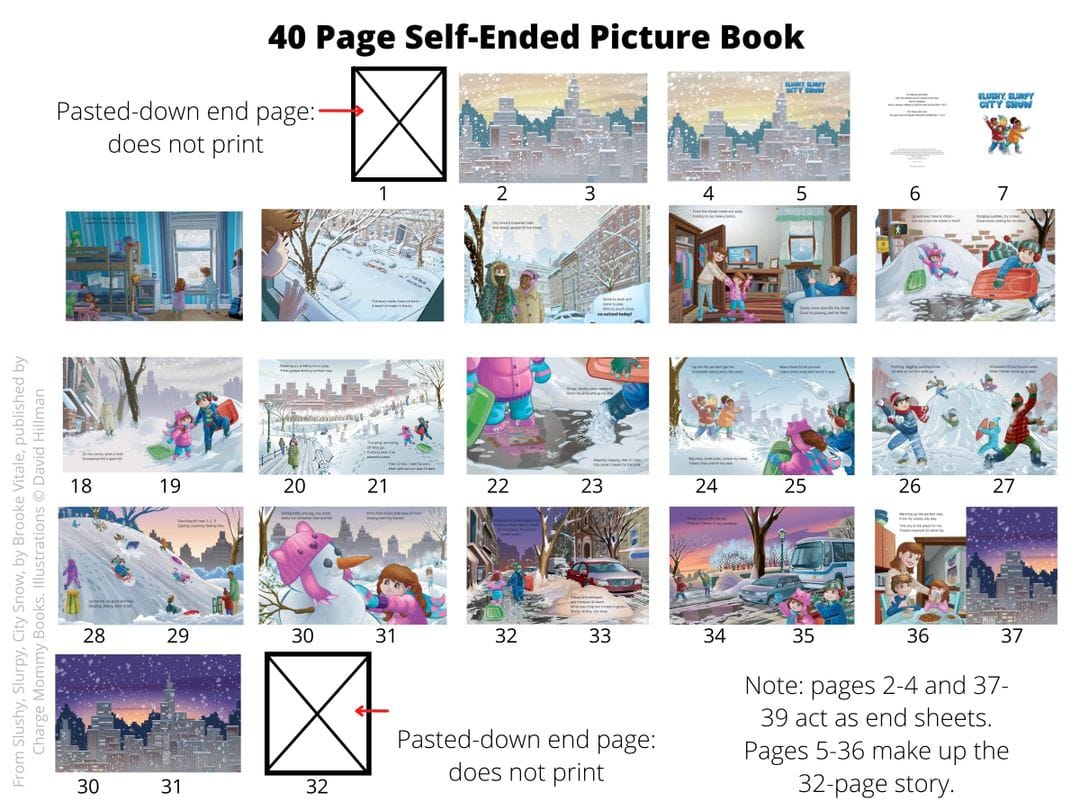
For authors who find that they need just a little more room to tell a story, a 40-page self-ended book may be a good option. This layout would enable an author to create one or two pages of endpapers at the beginning and end of the book, while providing between 2 and 4 extra pages for content.
What is a book with separate ends?
Separate ends are exactly what they sound like: they are separate from your book block and do not count toward your page count. Separate ends come in sets of 8 sheets, with pages 1 and 8 glued to the inside front and back cover of your book, respectively, and the other six pages glued to your book block to hold it in place. Between pages 4 and 5 of the end sheets sits the entirety of your book! (Remember, while these pages are labeled 1-8, they do not actually count as 8 extra pages on your page count.)
Below is a sample 32 page picture book template with separate ends:
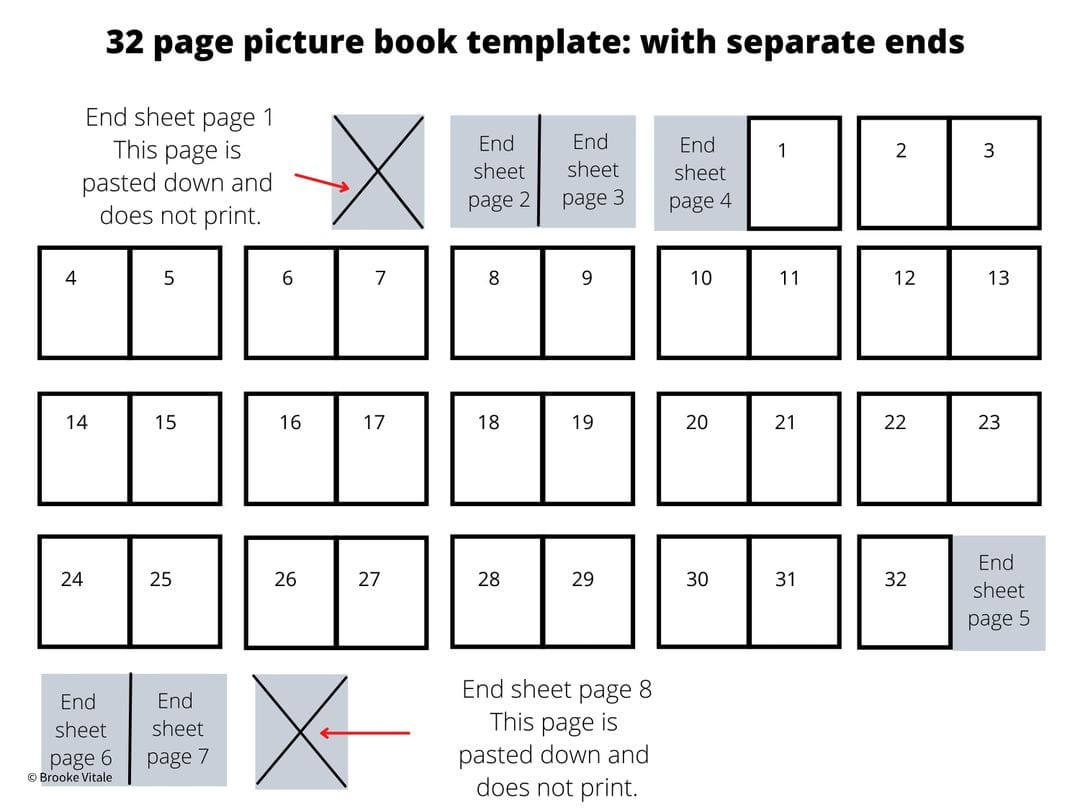
Pro Tip: If you are using a print-on-demand company, the pages noted as end sheets on the picture book template should not be included. The only page available to you are pages 1-32. If you are planning to print a hardcover children's book using an offset printer, you will also want to plan for book end pages.
For authors wanting a longer book, below is a sample 40 page picture book template with separate ends:
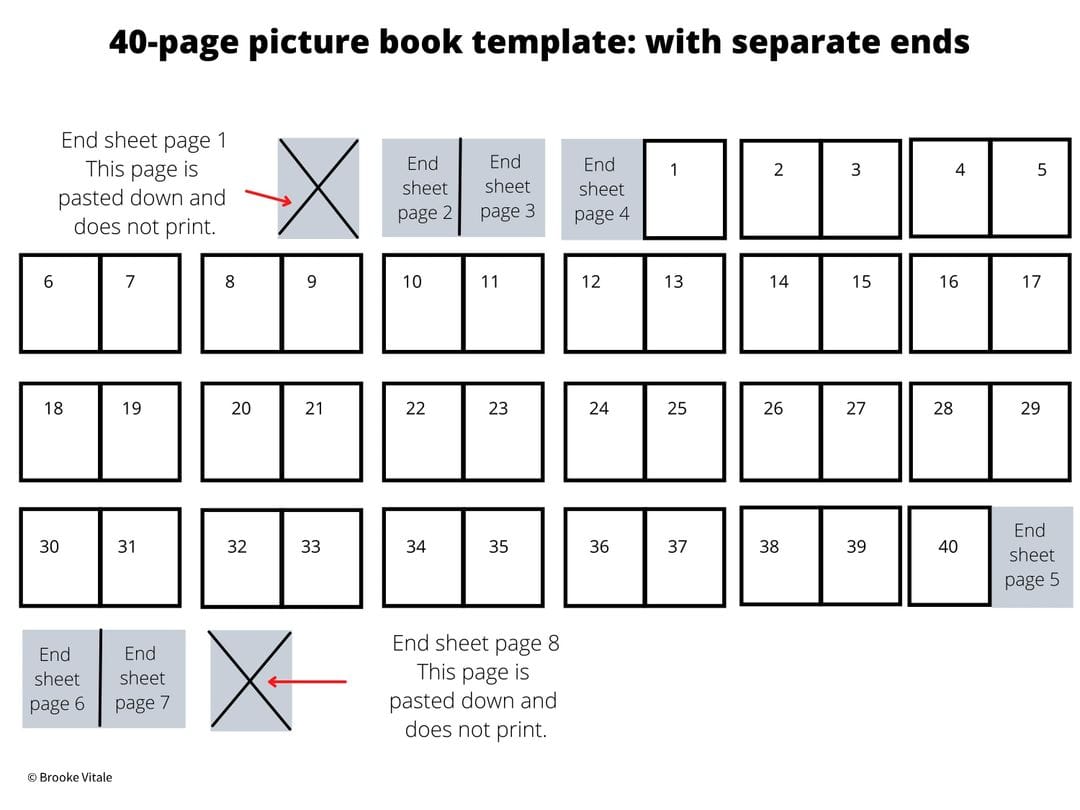
Pro Tip: Note that the only difference between a 40 page picture book template and 32 page picture book template with separate ends are the 8 additional pages added to the book block.
Print on Demand
Print on demand can be confusing, and it's not uncommon for authors to end up with extra white pages at the back of their book. Below is a template for a 32-page print on demand book.
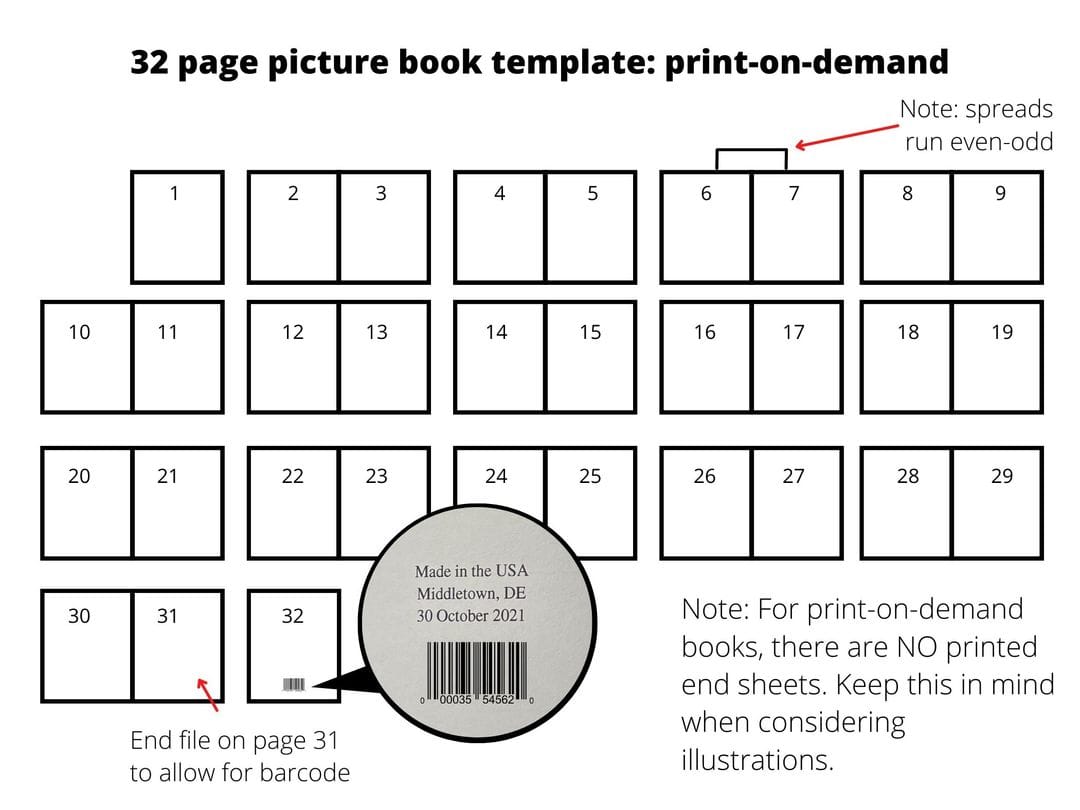
For authors who plan to print using an on-demand printer, it is essential to remember that these CANNOT be self-ended books. All print on demand books use separate, WHITE ends. While "designed" end pages could be added to a file, they will still be surrounded by plain white pages at the front and back of the book.
Because end pages cannot be created separately, this template is the same for both hardcover and paperback books.
What is a children's book template?
A children's book template, also known as a book map, is a rough page-by-page visual plan of text placement, story pacing, and illustration layout for a picture book. A children's book template allows an author to ensure that there is enough visual variety in the book design, and provides a strong starting point for crafting art notes. Below is an example of how a picture book template looks.
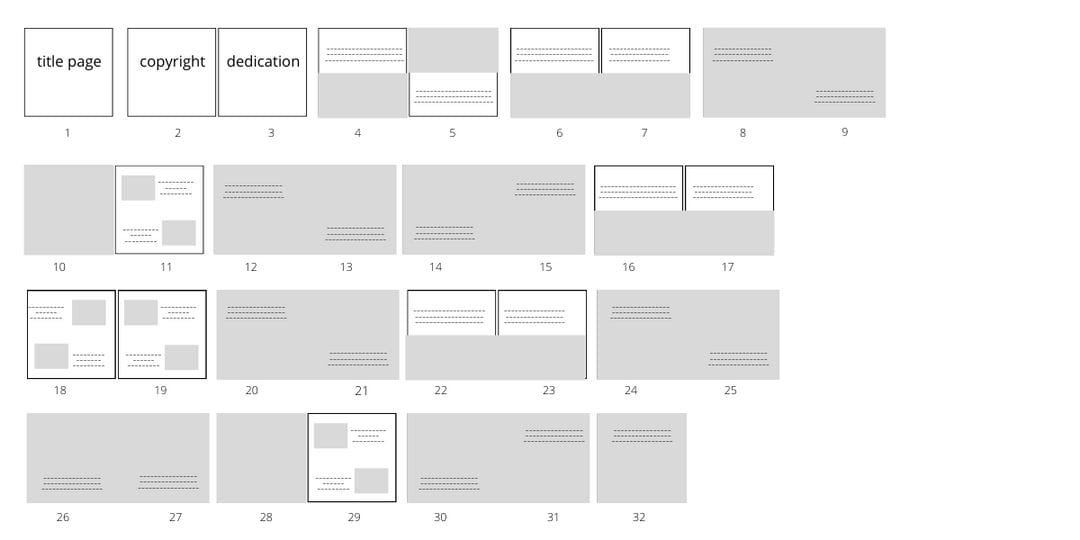
Pro Tip: A children's book template is not a formal book design template. A book design template should be created by a professional book designer prior to illustrating a children's book.
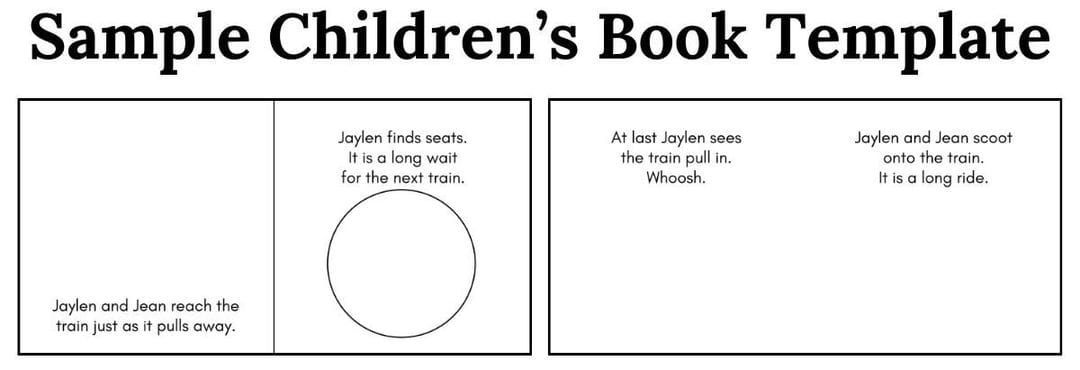
Below is a close-up example of a design template you might receive from a book designer. While I always encourage authors to hire a book designer, creating a template of your own is a good idea, too, as it is a good way to see how much text is actually on a page and how the text fits.
Making a children's book compelling is all about ensuring that every page moves the story forward and that page turns are set in a way that catches the reader's curiosity to force them to keep reading. Even if you are planning to seek a children's book agent and publish through a traditional publishing company, creating a rough children's book template is a great way to find places where a story isn’t working, or where a story moment isn’t sitting where it should be. Let's look at how to write a children's book template in 8 steps: determine front matter, establish scene breaks, identify page spreads, set page turns, check page word count, create art notes, decide on page layout, re-pace as needed.
How to write a children's book template
1. Determine front matter
The first few pages of a picture book are called front matter. This is what you might consider the “opening credits.” Front matter includes your title page, dedication, and copyright page.
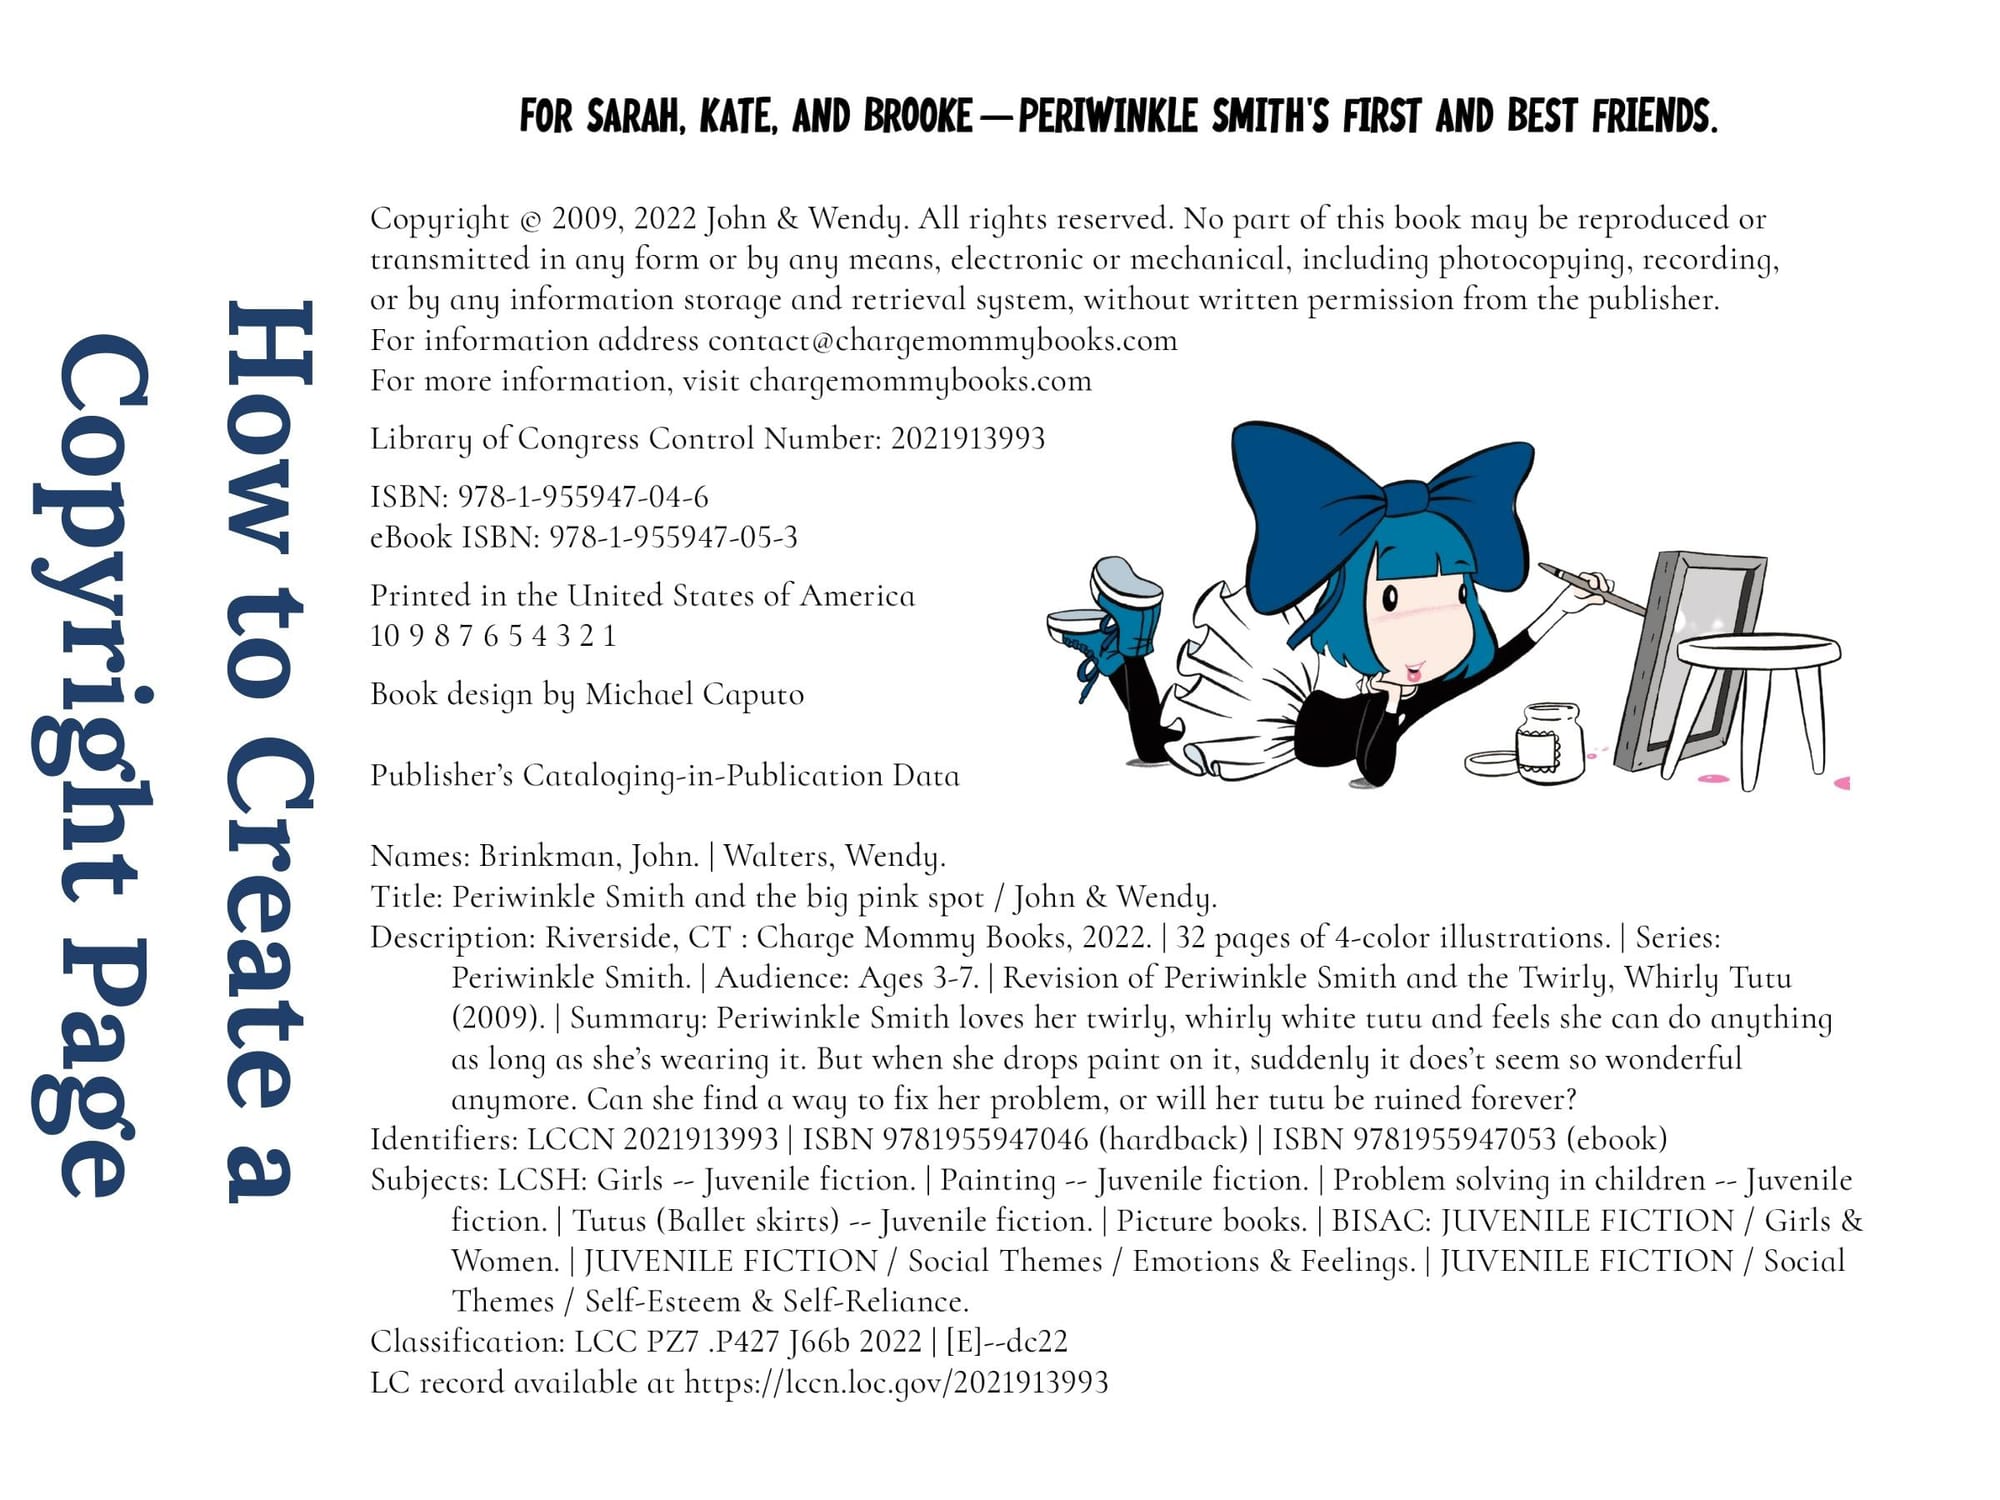 Related articleHow To Create a Book Copyright Page (with Template)Walk through every element of the copyright page with this 13-step guide, including a free copyright page template to make creating your own copyright page easy.Read the article →
But how you set them up is entirely up to you, and largely depends on whether your story would have a stronger start on a single page or on a spread.
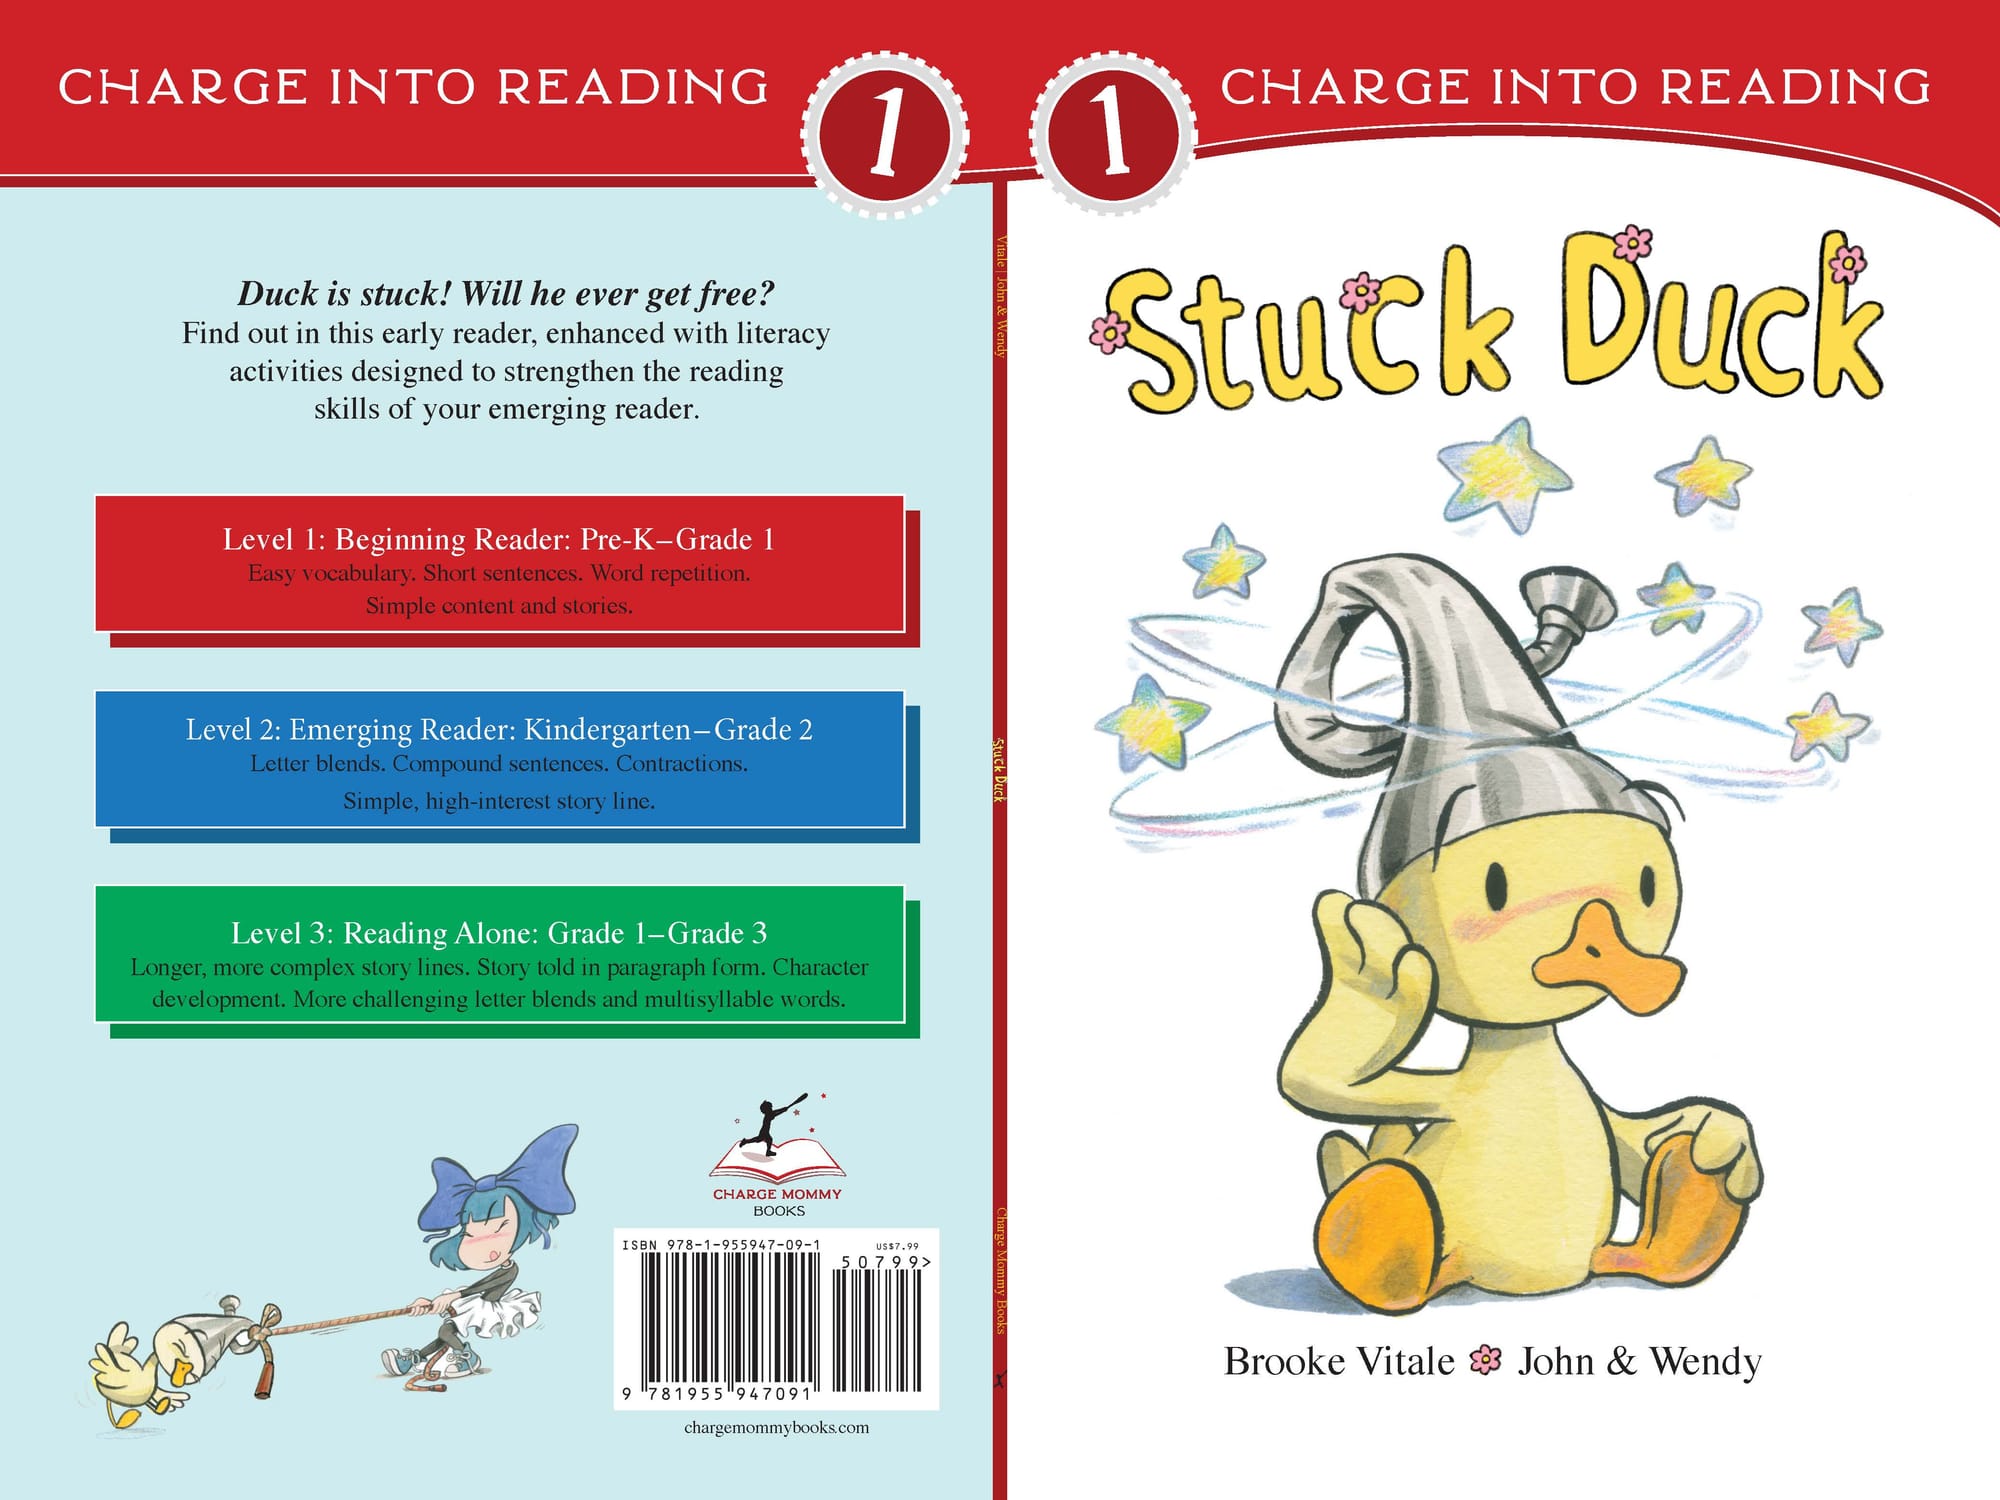 Related articleParts of a Book: Front Matter, Body, and Back Matter ExplainedParts of a book explained, including front matter, back matter, and body of a book. A guide to what the parts of a book are with visual examples.Read the article →
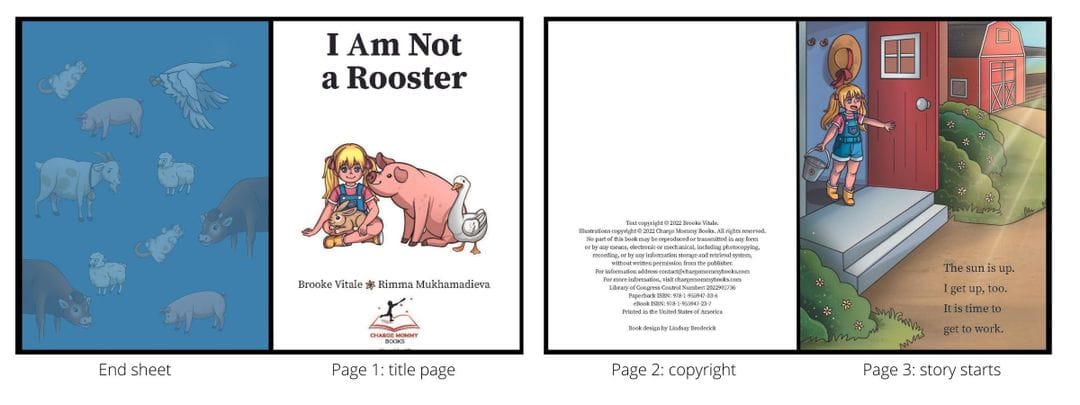
Some books begin with a small scene that doesn’t require much in the way of visuals and contains very little text. This might be the protagonist waving to the reader, waking up, or taking a very minor action that naturally leads to the page turn. In a case like this, beginning the story with a single right-hand page may work well. Traditionally speaking, such a picture book layout places the title page on page one, the copyright and dedication page on page two, and the story begins on page three. Below is an example of the front matter for a picture book that begins the story on page 3:
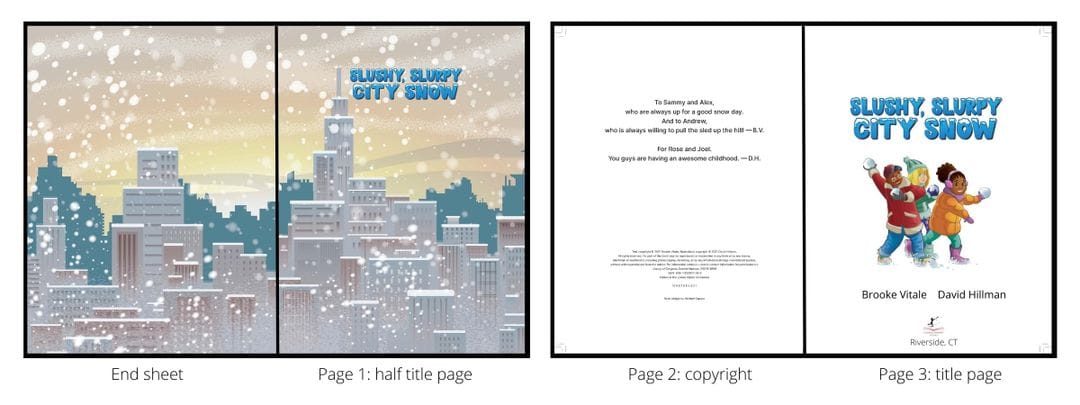
Other books begin with a larger scene that requires more space to illustrate and may have a higher word count. In instances like this, it is wiser to start the story on a full spread, or on pages 4-5 of the book. In this case, you have more options for book front matter. One option is to begin the book with a half-title page. A half-title page is a page that ONLY contains a book title and a piece of art. It does not list the publisher, author, or illustrator. A copyright page and full title page would follow. Below is an example of front matter for a picture book using a half title page and beginning the story on pages 4-5:
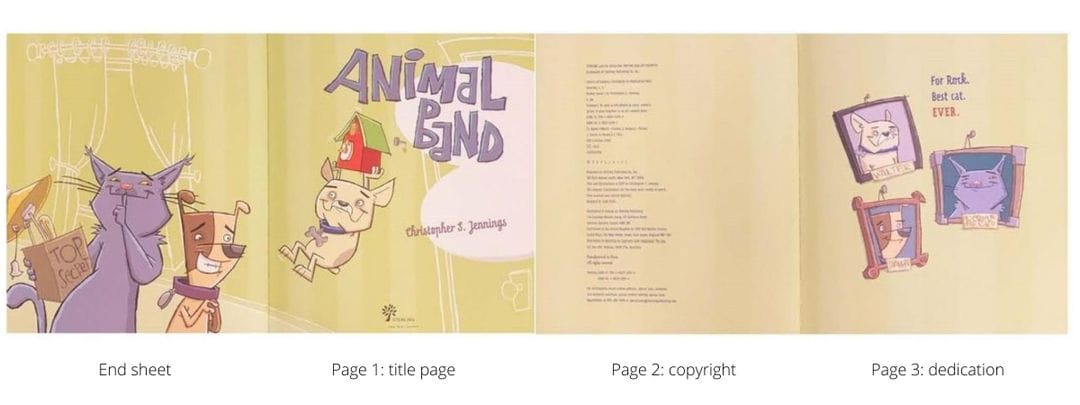
Another option is to include a page especially for the dedication. In this case, the title page would fall on page 1, the copyright page on page 2, the dedication on page 3, and the story would begin on pages 4-5, as below:
Finally, the copyright page can be moved to the back of the book, on page 32. In such a situation, the title page would fall on page 1 of the book, and the story would begin on pages 2-3. Below is an example of a book with the copyright page at the end of a book.
Pro Tip: If you are planning to print through an on-demand printer, beware this option as you will want to deliver a 31-page book file.
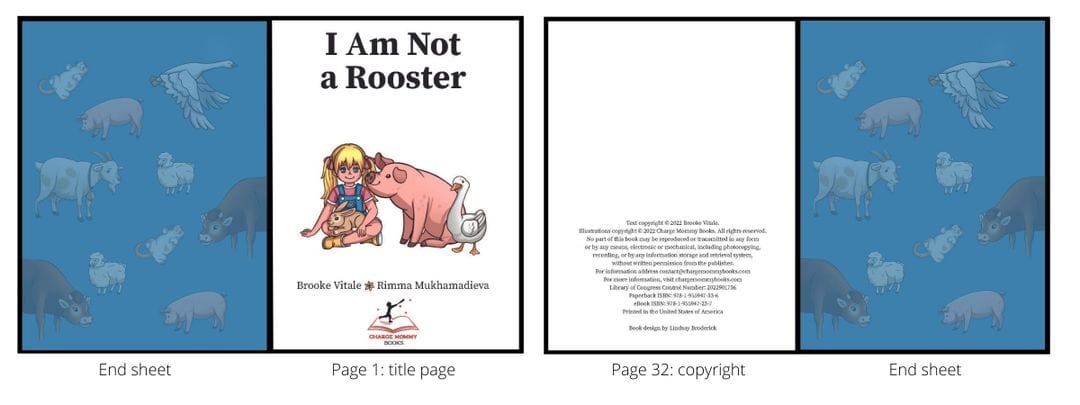
There is no right or wrong decision here, but deciding where the first page of the story sits—and by extension determining where front matter sits—is the first stage of setting up a children’s book template.
Pro Tip: Although all of the examples above include end sheets, the same page breaks would apply to a paperback book without end sheets.
2. Establish scene breaks
Each page or spread of a children's book should tell a mini-story unto itself. Once you have determined what page the story will start on, begin breaking the manuscript into the key story scenes. Don’t worry at this stage about page count or how much text is going on each page. Instead, focus solely on where the story shifts, and where you want the reader to turn the page to move on to the next moment. I often do this simply by drawing a line or adding extra space between the scenes.
Below is an example of my thought process when I was breaking up the pages for my book Say Cheese. In deciding on scene breaks, I took into consideration where I needed to create suspense in the story and where the scene was physically shifting. Note that I began simply by adding a line break where I thought I wanted scene breaks to go.
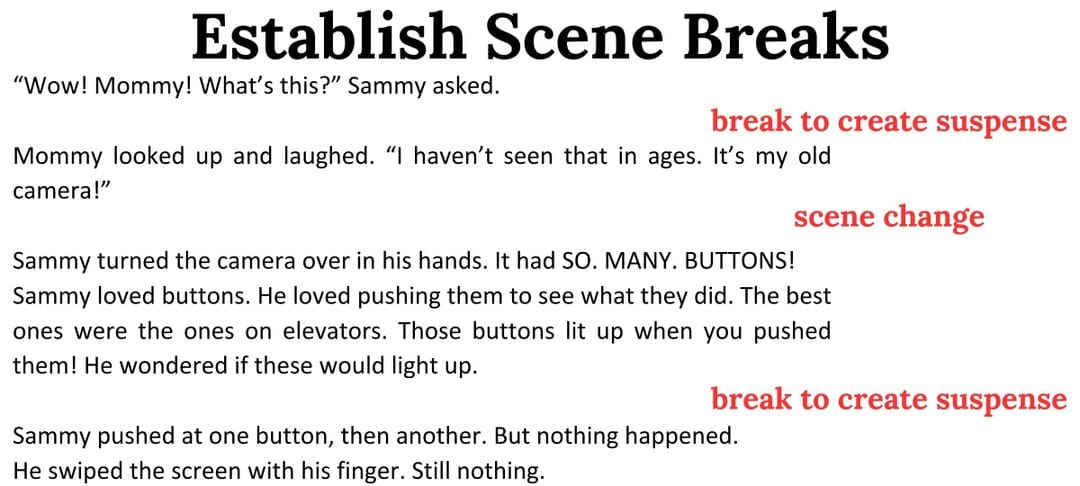
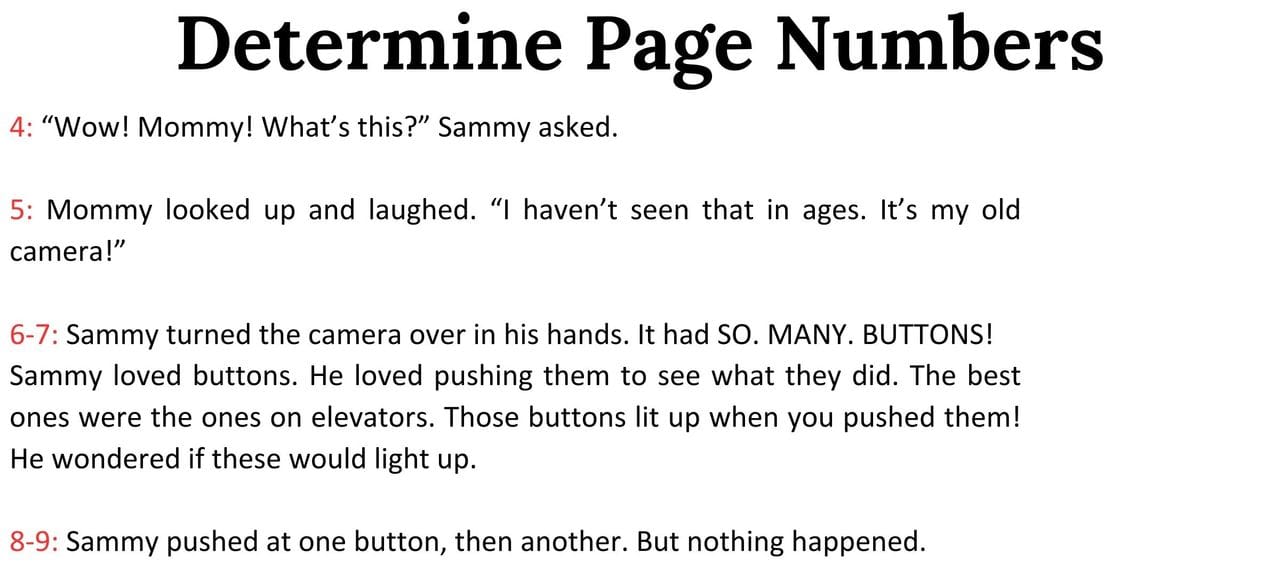
Once the story has been broken apart, number each page. Begin with page 3 if you plan to start on a single page or page 4 if you plan to begin with a full spread. I always begin by assigning single page number to each scene. This allows me to see if the story is running too long or too short. Below is an example showing the addition of page numbers ot my manuscript. Note that the spreads run even-odd.
3. Set page turns
Sometimes in a book, one story moment will lead naturally to the next, even when both require their own illustrations. This is usually a continuation of the same scene, and may be reflected either as a full-bleed spread or as two connected illustrations.
Page turns, on the other hand, should occur when the story moves to a new scene, either physically or emotionally. Big reveals should also happen at page turns, with the buildup coming on one spread and the reveal or resolution on the next one. By keeping this tension at the end of a spread, the reader is compelled to turn the page to find out what happens next.
Take a look at the page numbers you created in the previous step. Are the pages where you want to force a page turn always falling on a right-hand page (an odd page)? If so, that’s great. If not, look at the pages that come before. Which can be either run together onto a single page, or can be turned into spreads to push your page turn to the right spot in your layout.
4. Identify page spreads
Take a look at how you broke your scenes apart. This is your moment to decide which scenes are important enough to merit a full spread and which can be conveyed in a single page. Wondering what the difference is between a spread and a single page?
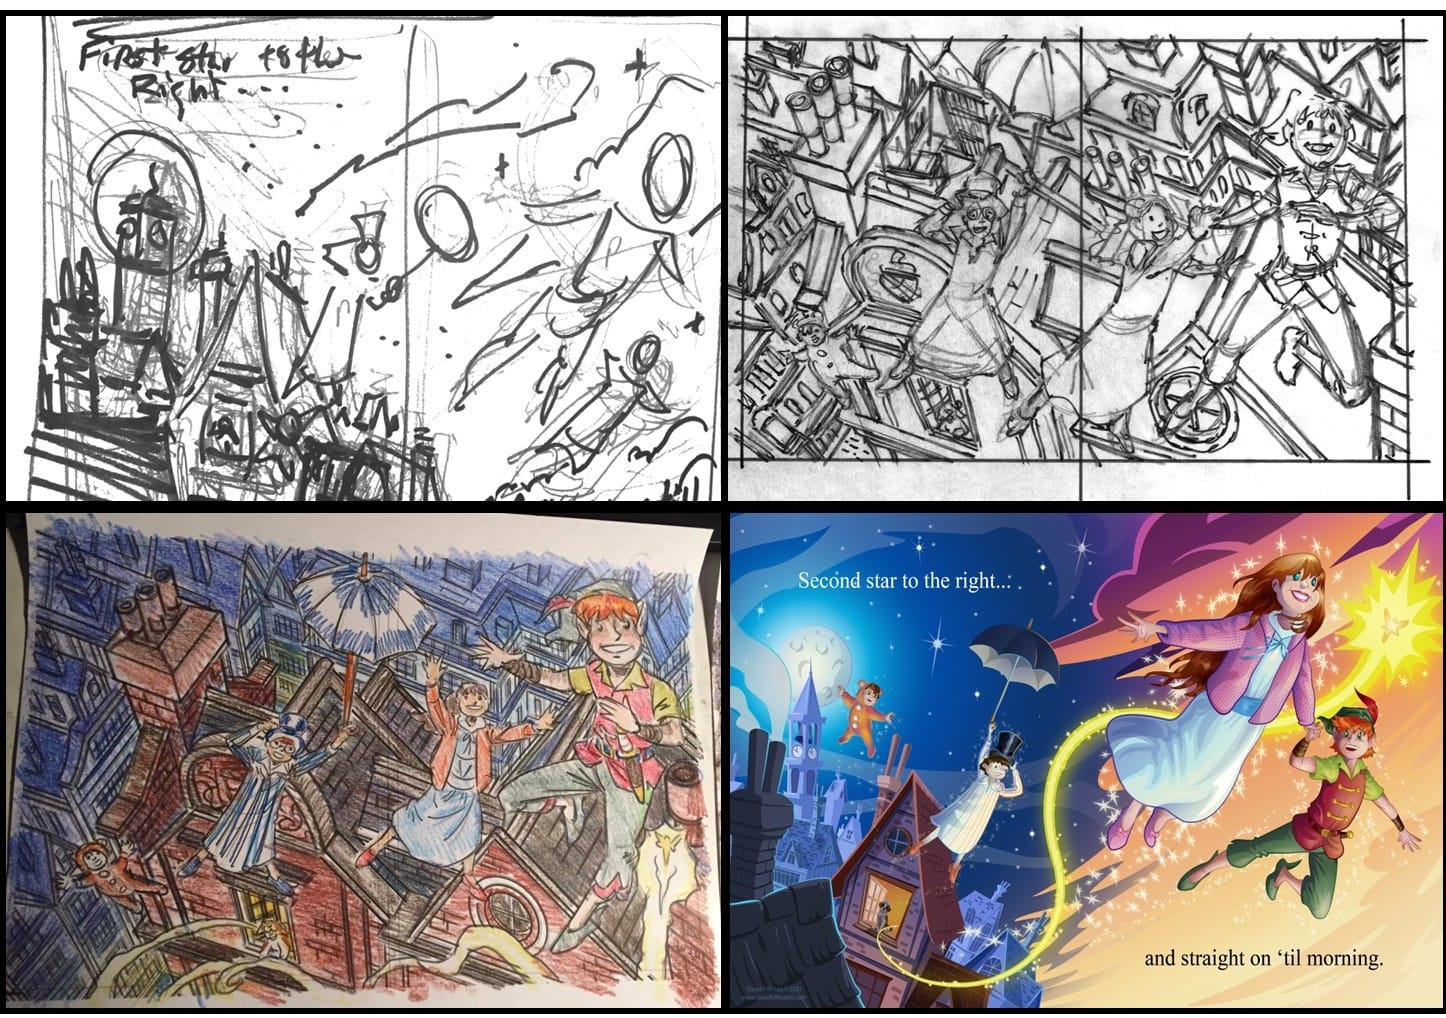 Related articleHow to Illustrate a Children's Book: A Step by Step GuideA guide to children's book illustration: Learn how to illustrate a children's book, work with an illustrator and the elements of picture book illustration.Read the article →
Going page by page, determine which scenes portray the most important moments in your story. Moments that pack a major emotional punch or that serve as a turning point in the story should sit on a spread rather than a single page. Once you have identified the key moments, re-pace your story, assigning new page numbers to allow the key moments to take up a full spread.
Below is an example of how I decided whether the pages in Say Cheese should be single pages or spreads.
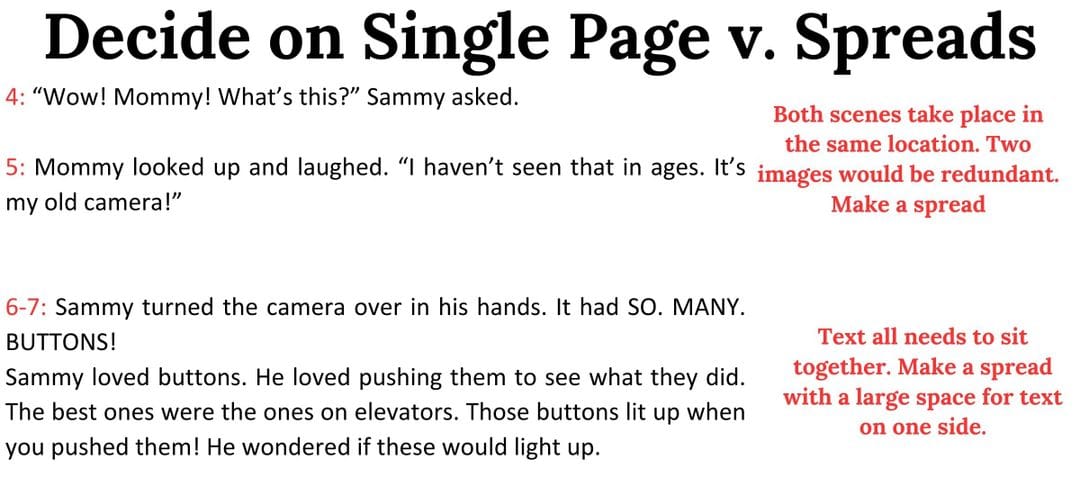
Pro Tip: Each time you re-pace a story, keep an eye on the end of the book to ensure that your story isn’t now running too long.
5. Check page word count
In pacing a story, it’s easy to end up with too much text on a page. In an ideal world, a picture book page would have between 10 and 30 words per page. But most books aren’t ideal, and you will end up with pages that have more than 30 words. My general rule of thumb is to make sure I do not exceed 50 words on a page. If your text is running too long, you might need to cut.
 Related article5 Steps to Cut Text in a Picture BookYou've written your picture book, but it's coming in well over 1,000 words. So what do you do now? How can you trim it down to an acceptable length when you think your book is perfect as-is?Read the article →
If a single page has more than 50 words and the manuscript truly cannot be trimmed any more, it may be time to consider shifting a single page to a full spread to allow more room for text. As always, remember that changing one page will impact all those that follow, so a later page may also need to become a spread (or may need to shift to a single page) to compensate.
6. Create art notes
A picture book template would not be complete without art notes. Art notes are your way of telling an illustrator what you envision in a scene. Although I do not typically lay them into the document, I do find it helpful to know what I envision on each page. Once the book has been broken into its individual pages, start thinking about what the illustrations on each page will look like. Then review your notes.
If you find that too many pages in a row are going to look the same, you may want to consider condensing into fewer pages. For me, I know this is a problem when I start typing “Same scene as above, but from a different angle so it looks different.” An art note like that is a dead giveaway that the book is dragging and my page turns are not compelling enough.
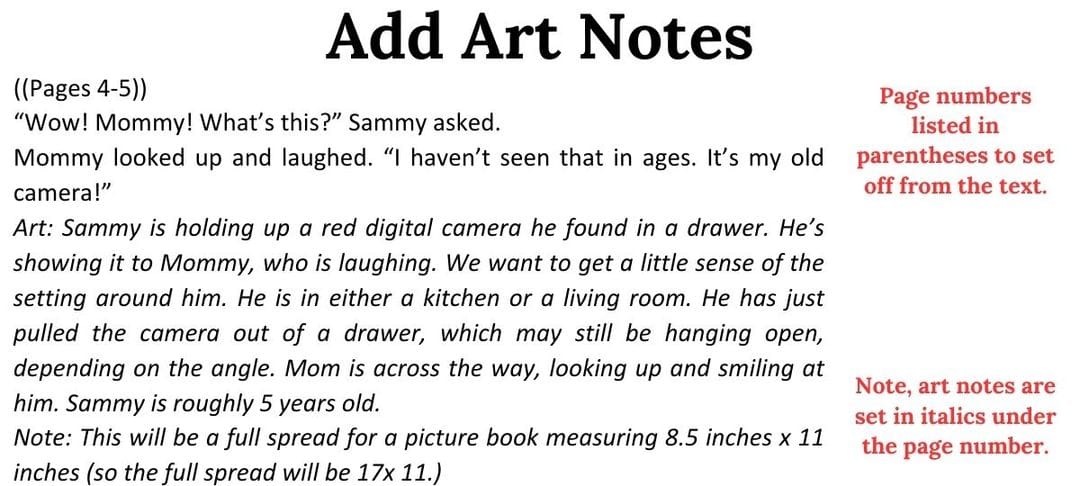
The opposite can occur as well. It may be in writing your art notes that you find you need too much too happen on one page, or that there isn’t space to show each action you want illustrations to depict. In that case, you might consider including two spot pieces of art on one page to show more, or you may consider breaking a scene into multiple pages.
Below is an example of my design template with art notes in place. You may choose to lay out this way, add the art notes to your manuscript, or both!
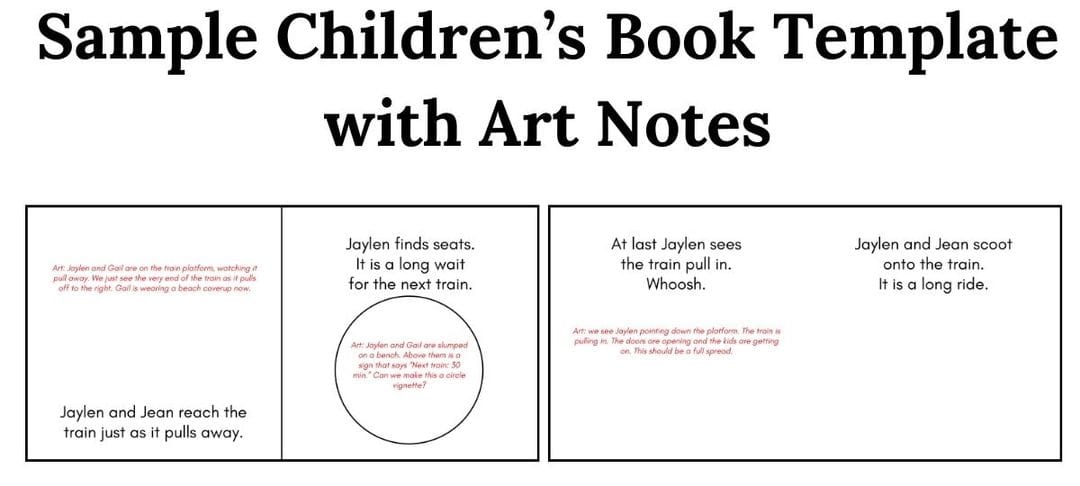
Pro Tip: When sending a manuscript to a book designer, be sure to send a draft with page numbers and art notes and one without. Any time a designer needs to remove text from the document, they run the risk of cutting out relevant text as well. Avoid that problem by providing a clean version that only contains your manuscript.
7. Decide on page layout
In truth, this step will largely be done by a book designer. But as an author, I find it helpful to consider what I want my pages to look like. This gives my designer a starting point and also provides my illustrator with more information what size the art they are creating should be. Including this plan in my children’s book template also allows me to make sure the book contains enough visual variety.
When it comes to picture books, there are several standard page layout options: full-bleed spread, full-bleed page, vignettes, and spot art. These page layouts can be mixed and matched. Below are some examples of the most common children's book page layouts.
Full-bleed spread:
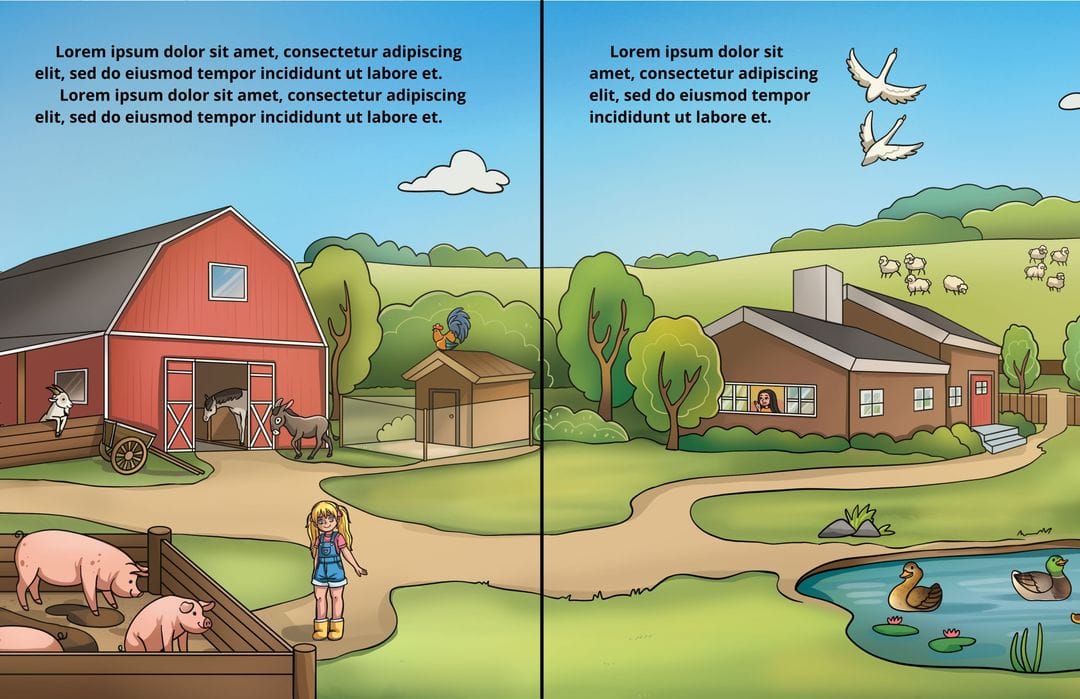
This is the most common picture book layout. In a full-bleed spread, a single illustration extends across both pages, as in the example below.
Pro Tip: Take note of the open space for text. It is essential when creating full-bleed spreads to leave a natural space in the illustrations for text to sit. This allows the page to look cohesive and keeps text legible.
Two full-bleed pages:
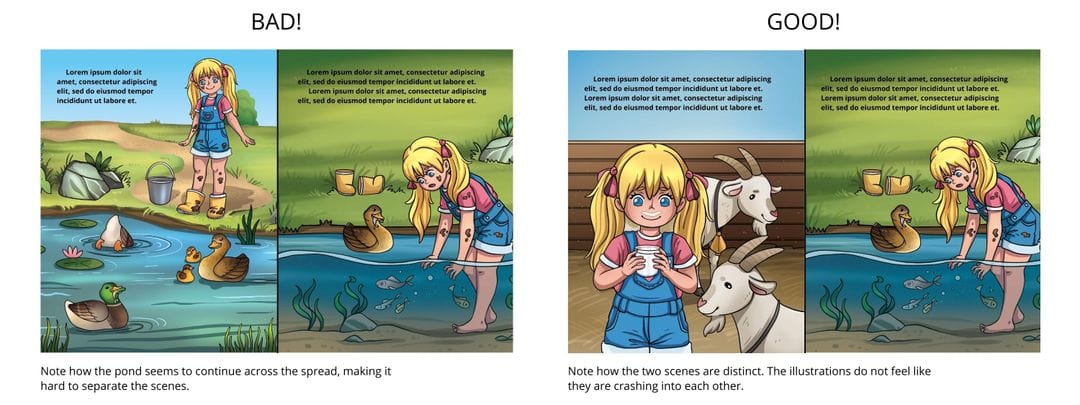
This is the second most common picture book layout. With this design, each illustration extends across an entire single page. But beware. When creating a layout in this way, it is essential for both pages to have their own distinct look so that the art on one page does not feel like it is bleeding, or crashing, into the facing page.
Take a look at the two examples below. In the two images with the pond, the water seems to flow together, making for a disorienting scene. In the image with the goat, the distinction between pages makes for a clear delineation between scenes.
Full-bleed page and vignette:
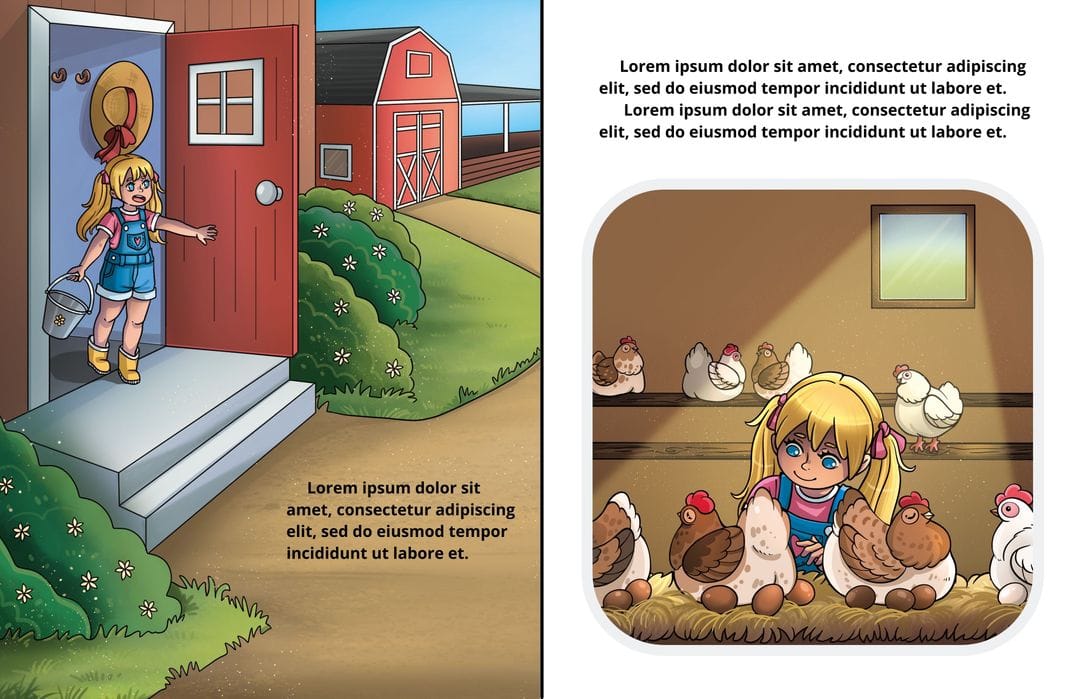
A vignette is a piece of art that is cut around the edges, meaning it does not extend to the edge of the page. Facing a vignette against a full-bleed page is a great way to prevent art from crashing together..
Full-bleed page with spot art:
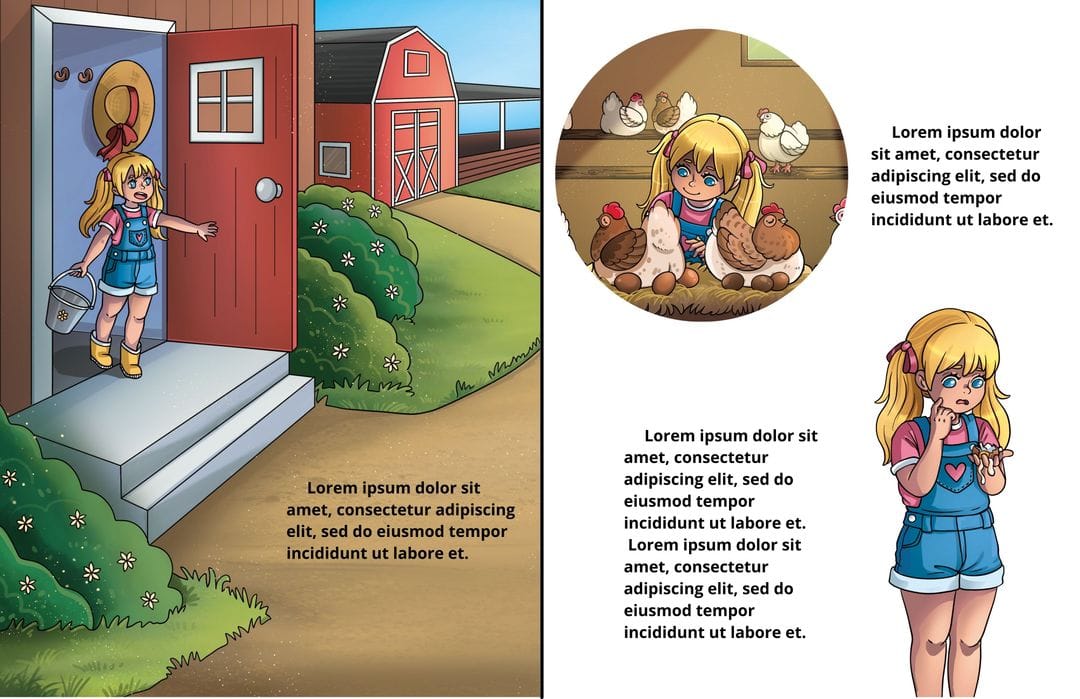
Another way to avoid crashing art is by balancing a full-bleed page against a page with two pieces of spot art. This works particularly well if two smaller scenes need to be illustrated on the facing page.
8. Re-pace as needed
Creating a children’s book template correctly rarely happens the first time through. Each page change impacts the next. There is no such thing as too many attempts at pacing a story. Did you get to 32 pages? If not, readjust as needed to get to the right page count. (Or decide that you are okay with not having a 32-page book!) Don’t worry if it takes a few tries to organize your pages properly. Even the most seasoned pros are constantly rearranging!