How to Publish a Book on Amazon: 10 Steps to Success
Contents
Amazon KDP stands for Amazon Kindle Direct Publishing. KDP is Amazon’s print-on-demand solution for authors who wish to self-publish, but who do not wish to print, store, and ship books in bulk. Amazon KDP allows authors to publish hardcover, paperback, and eBooks at no cost (as opposed to services such as IngramSpark and LuLu, which charge a setup fee.) These books are printed and shipped by Amazon as the orders are received. The only costs associated with Amazon self-publishing are a book printing fee (or eBook delivery fee) and a royalty to Amazon on each book sold.
Pro Tip: Running ads on Amazon is separate to publishing, and incurs its own fees.
Amazon self-publishing is available in a variety of countries. For a full list, Amazon KDP's complete territory list .
1. Design the book
In truth, there are multiple steps between deciding to publish a book and designing the files. (At least 9 of them! Check out How to Self-Publish a Children’s Book in 18 Steps for a complete breakdown of them! ) But as none of those steps are directly affected by the decision to publish a book on Amazon, they do not make sense to discuss here. For this article we will focus on what to consider and the steps involved in designing a book specifically for KDP. Which starts with . . .
Book size
Choosing a book’s trim size is critical to designing a book. Whether a children’s book with illustrations or a novel with just text, a book cannot be laid out without knowing what size the book will be. And especially for books with art, this is a decision that must be made early so that illustrations can be made to match the book trim size. Here’s the catch: Amazon KDP offers a limited variety of trim sizes. That’s why it’s important to choose first. The last thing any author wants is to get a book ready to print, only to find out that it is designed at an unusable size. For a full listing of KDP sizes, check out my article, The Best Trim Sizes for Children’s Books.
Page count
Page count plays a huge role in book design. For a picture book, it determines what art needs to be created. For both picture books and novels, it determines how deep the gutters on a page will be and what margins are needed to make sure text and illustrations clear the gutter. (For more information on the book gutter, check out my article, How The Book Gutter Impacts Children's Book Layout and Illustrations.) Page count also impacts the width of the book’s spine. All of that means that without knowing how many pages a book has, it cannot be properly designed. Especially for a novel, it is a good idea to roughly run in text at the right trim size to see how many pages a story takes up.
And remember, Amazon prints in page multiples of 4, and includes one page at the end for their barcode. So final page count be a multiple of 4, MINUS 1 to avoid blank pages. (For more information on avoiding blank pages, check out my video, Amazon On-Demand Printing .)
Download an Amazon KDP cover design template
A design template is a document that tells a designer what trim size the book is, how much bleed is needed, and what the margins are. When choosing a template through Amazon KDP, authors will be asked to select trim size and a range for the page count so these measurements can be properly calculated.
Below is an example of a KDP design template for the cover of a 6x9 book. Note how it calls out not only the trim size of the front and back cover, but also the spine width to ensure it is properly accounted for.
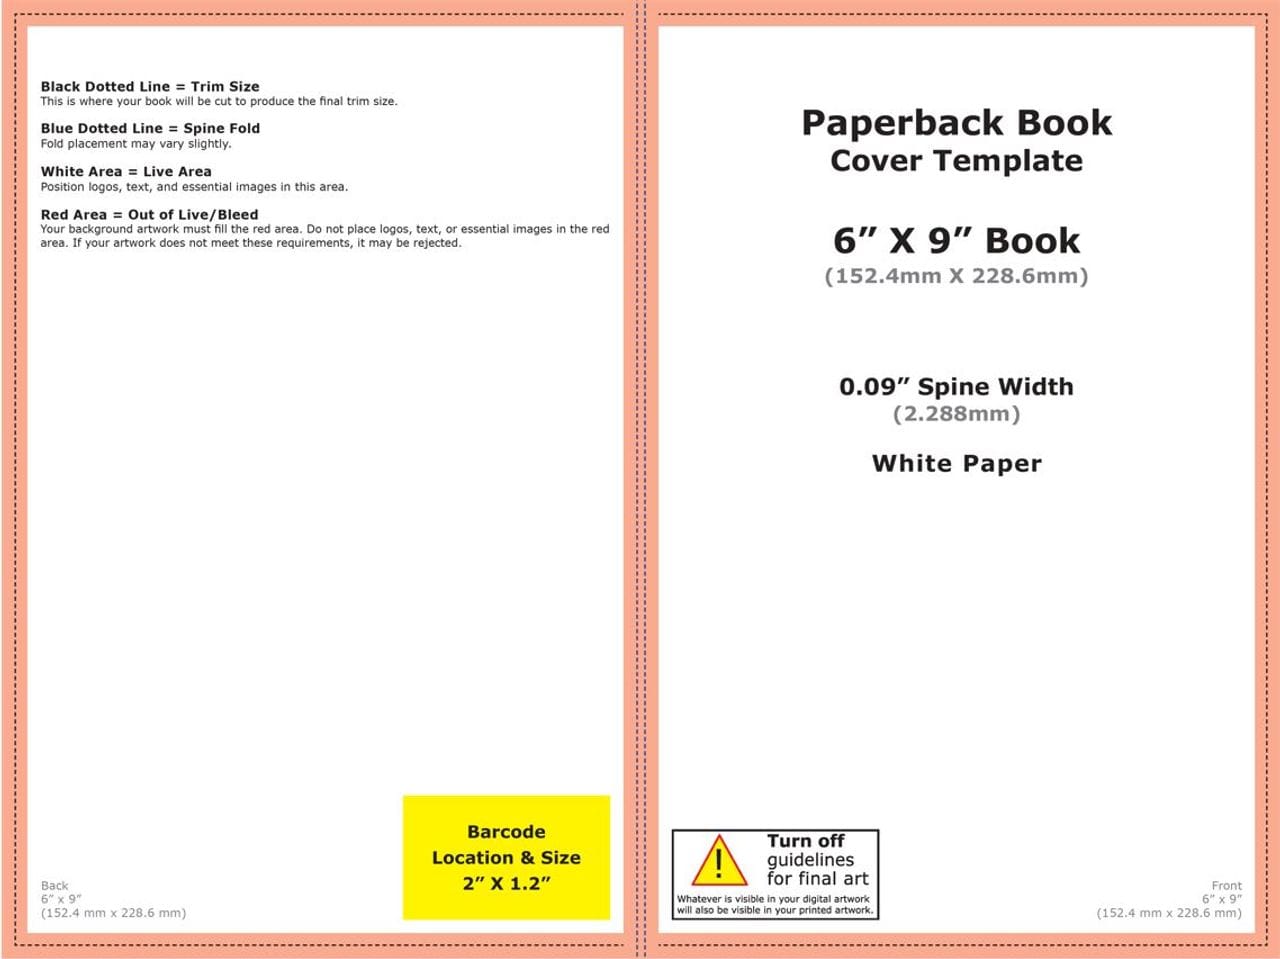
If printing in hardcover, the design template is even more important as it will also show how much extra space is needed for the cover to properly wrap around the hardcover boards.
Pro Tip: While it might be tempting to grab a design template from somewhere else—or forego it entirely—don’t do it. Every printer is different so be sure to download the exact design template you need from Amazon’s KDP site. Download Amazon KDP's cover design templates here.
Pro Tip: Make sure when designing a book to include bleed in your book files. Bleed is extra room beyond the trim size to account for shifting in the printing process. This is especially important if printing a book with art that bleeds to the edges.
2. Export book files
Uploading a book to Amazon KDP can be a real headache if the files aren’t done properly. And publishing a book on Amazon requires different files for different kinds of books. So let’s take them one at a time:
Hardcover and paperback cover files:
The best way to upload a book cover on Amazon is simply to use a PDF. (Amazon does offer a cover creator feature, but simply supplying a print-ready PDF is far easier.) Make sure the PDF shows the front cover, spine, and back cover of the book all in one spread. Create your cover PDF as a full spread with bleed, but WITHOUT crop marks, as in the example below.
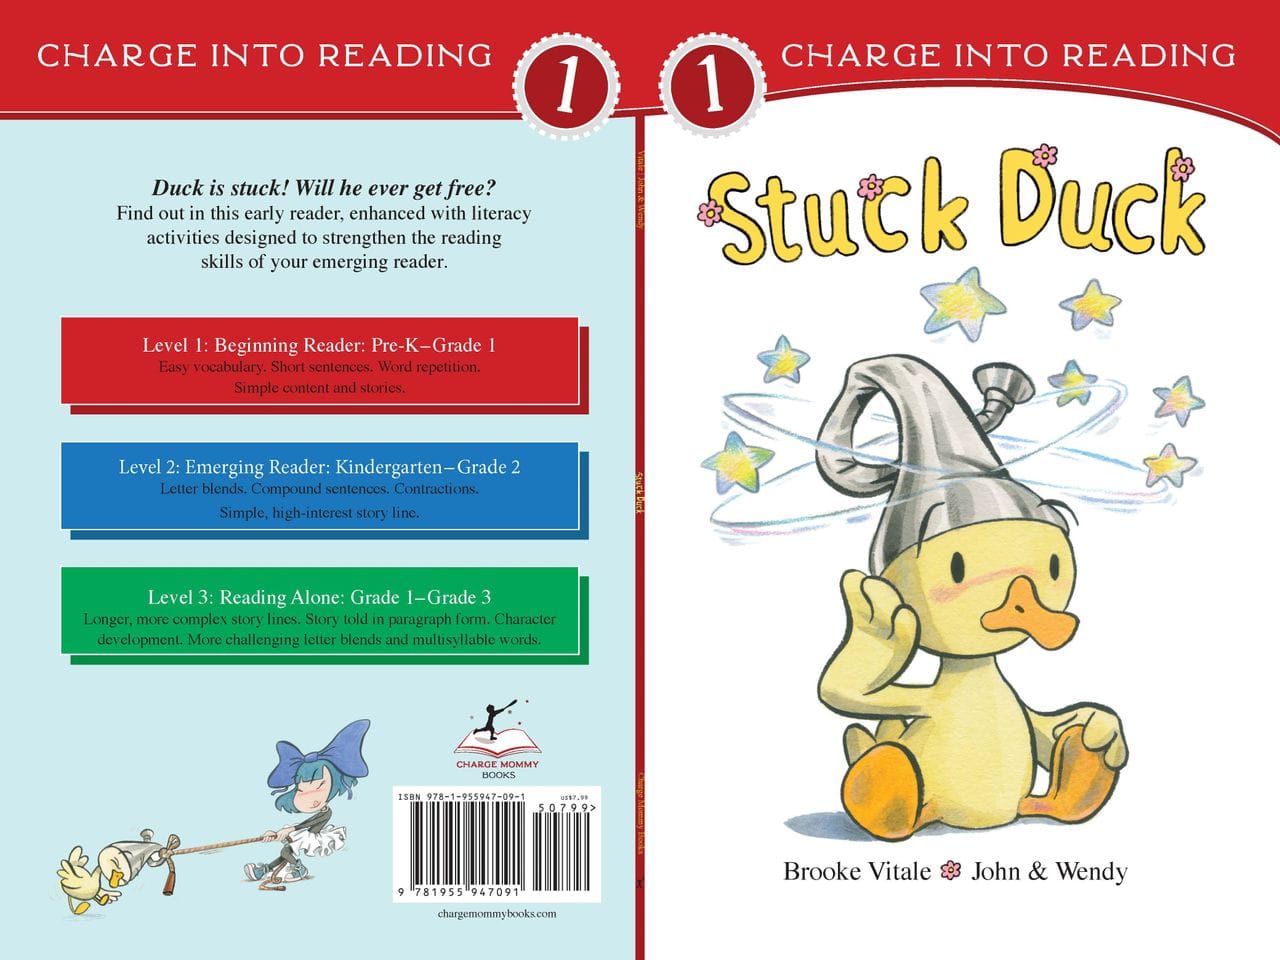
Hardcover and paperback interior files
The best way to avoid mistakes when publishing a book on Amazon is to use a PDF for the interior pages as well. Doing so will ensure that your formatting stays in place and that errors don’t creep in. (Amazon does accept .DOC, .DOCX, HTML, or RTF files, but their own guidelines state a preference for PDF.) Create your interior PDF as single pages with bleed all around but no crop marks.
eBook cover files
Because eBooks are not printed, they do not require extra bleed, nor do they have back covers or spines. Create your eBook cover as a JPG of the front cover without any extra bleed.
eBook interior files
eBook interiors can be created one of two ways: as fixed format eBooks (recommended for picture books, cookbooks, and other image-heavy books) and reflowable eBooks (good for middle grade, YA, and novels, as they allow size and font to be changed). For a breakdown on reflowable text and what to consider before using it, check out my article, When Should I Use Reflowable Text in my Ebooks? But, in the meantime, let’s talk about how to create those files:
Fixed format eBooks
Fixed format eBooks are books in which the art and text cannot move. Because the pages are usually built as spreads, it is important that they appear that way in the eBook.
Once pages are laid out, export them as flattened JPGs. This will lock your art and design in place as spreads. Reupload those flatted JPGs into your design program, and then export the book as an ePub. Creating files in this way will keep the spreads together, providing for a cleaner reading experience.
Reflowable eBooks
Reflowable eBooks are a different creature entirely, and not one I recommend undertaking on your own without the assistance of a skilled book designer. Properly creating a reflowable eBook that can take advantage of all the features Amazon Kindle offers requires using HTML, CSS, and coding. That being said, if it is something you want to take on yourself, check out Amazon’s article, Prepare Reflowable and Print Books with Kindle Create.
Once files have been created, you are ready to upload a book to publish on Amazon.
3. Set up your Amazon profile
Publishing a book on Amazon means that Amazon has to pay you for books sold! But they can’t do that if they don’t know who you are or how to pay you. Which means you need to set up an account. Begin by visiting Amazon KDP's registration page. If you already have an Amazon account, you can register with your existing account. If you prefer to have your account tied to a different email address, you can set up a new account altogether.
Click “Update” in your account information and fill in your business and tax information. You need to have this in place before you can publish a book on Amazon, so don’t skip this step!
Once your tax information is in place, click “Finished” and return to the main page to begin setting up your first book!
4. Select a book format
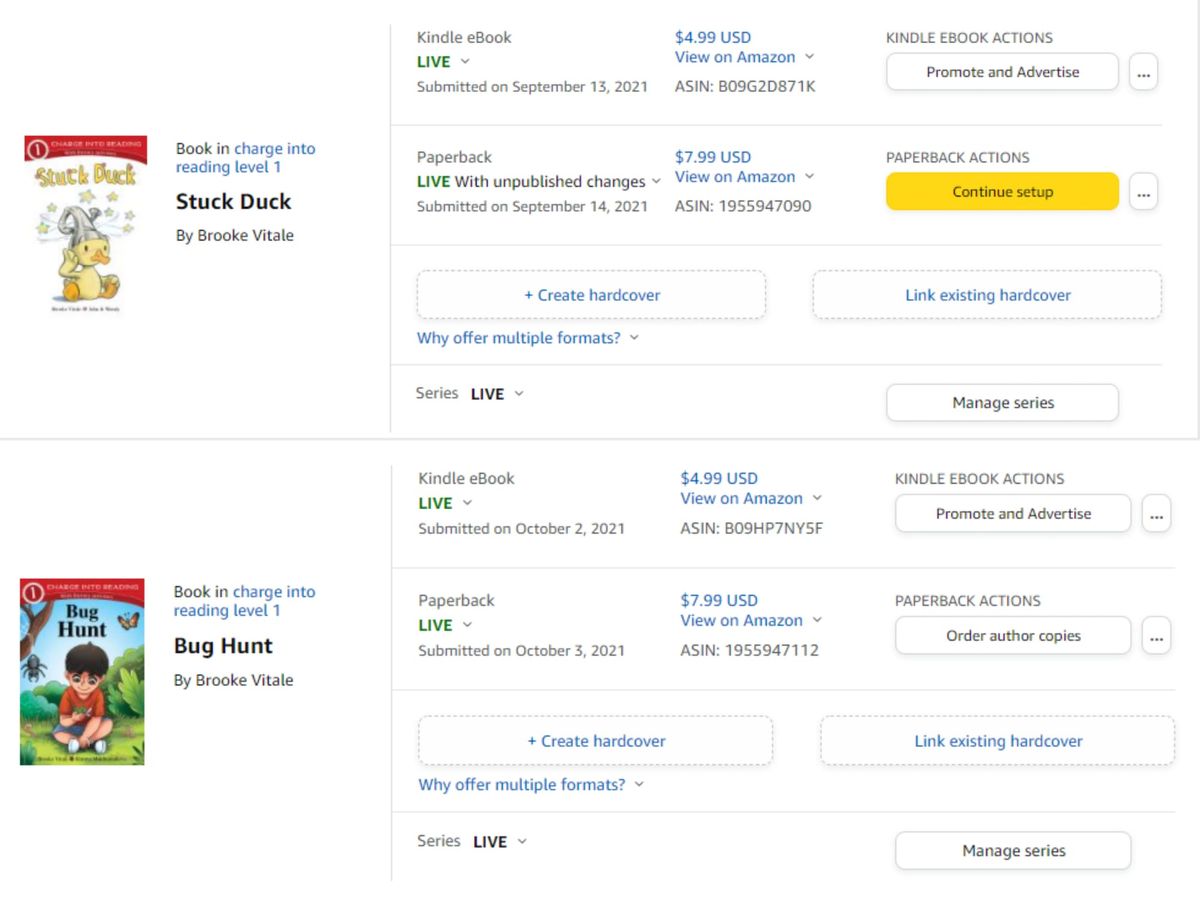
To begin, visit your KDP Bookshelf. This is where everything begins, and the first decision to be made is what kind of book you want to publish on Amazon: eBook, paperback, or hardcover.
Below is an example of what this page looks like:
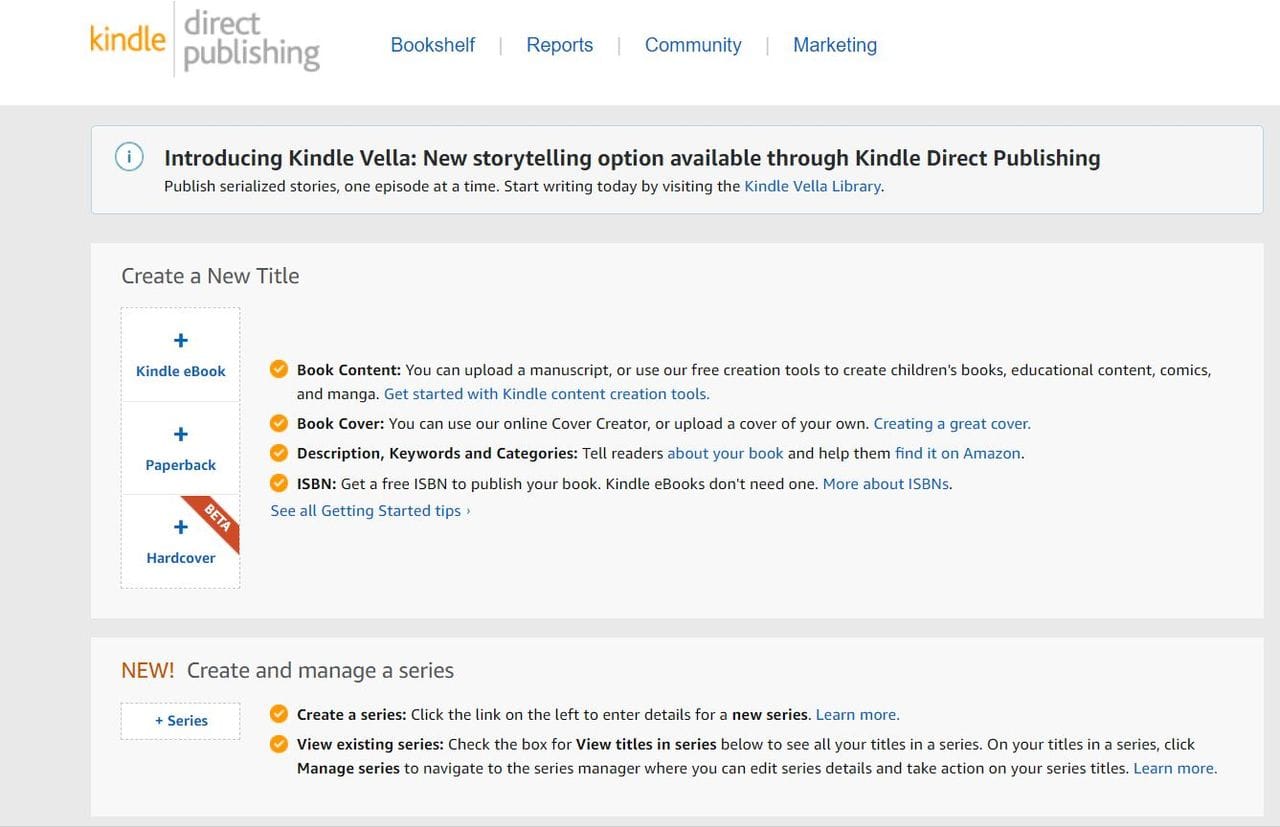
Once you have completed setup for one book, you will be able to create linked files for other formats of the same book, so you there is no right or wrong format to start with. Personally, I always start with my paperback book, so let's walk through the process of uploading a paperback book, and then come back to eBooks.
5. Paperback details
Language and title
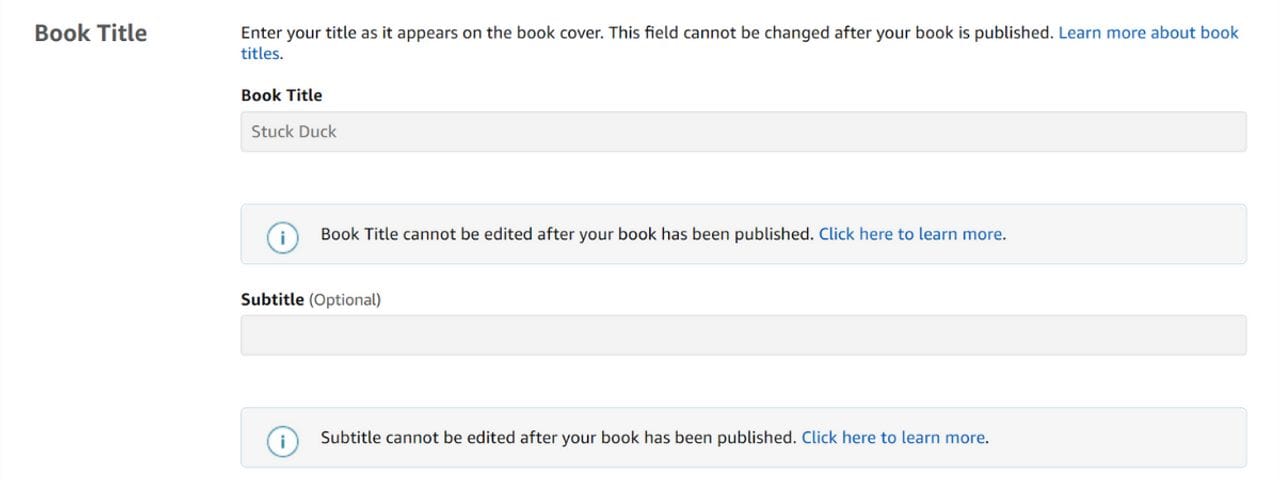
Once you have selected a format, you will be taken to the book details page. Here you will be asked to define the language your book will be printed in and the title of the book.

Pro Tip: Once a book has been published under a specific title, it cannot be changed. Make sure before you finish this process that you are 100 percent sure your title is correct.
Series
If your book is part of a series, this is the place to identify it as such. If you have set up a series in the past, you will be prompted to pick the series the book belongs to, and to confirm that the information about the series is correct.
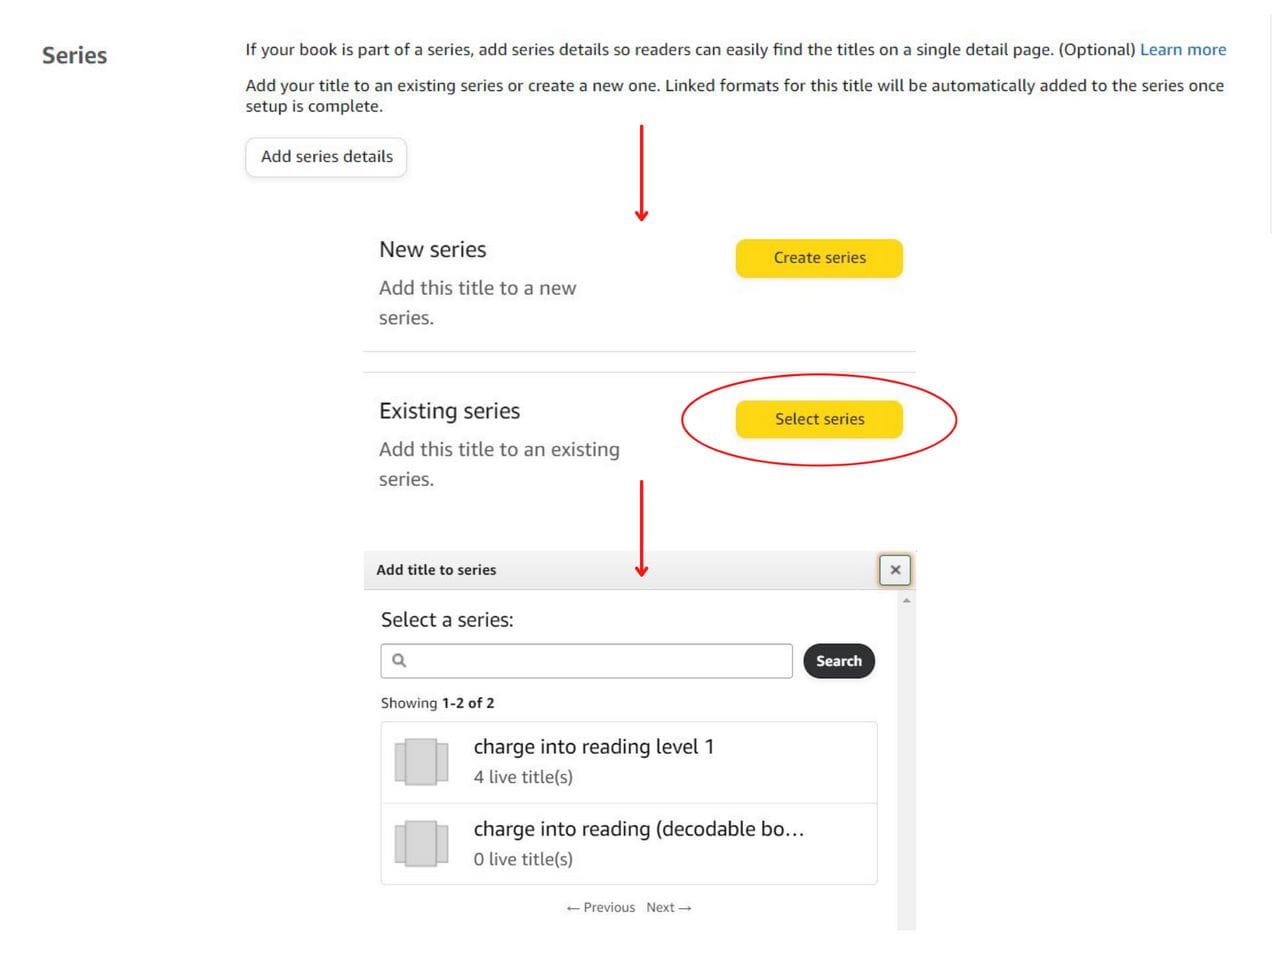
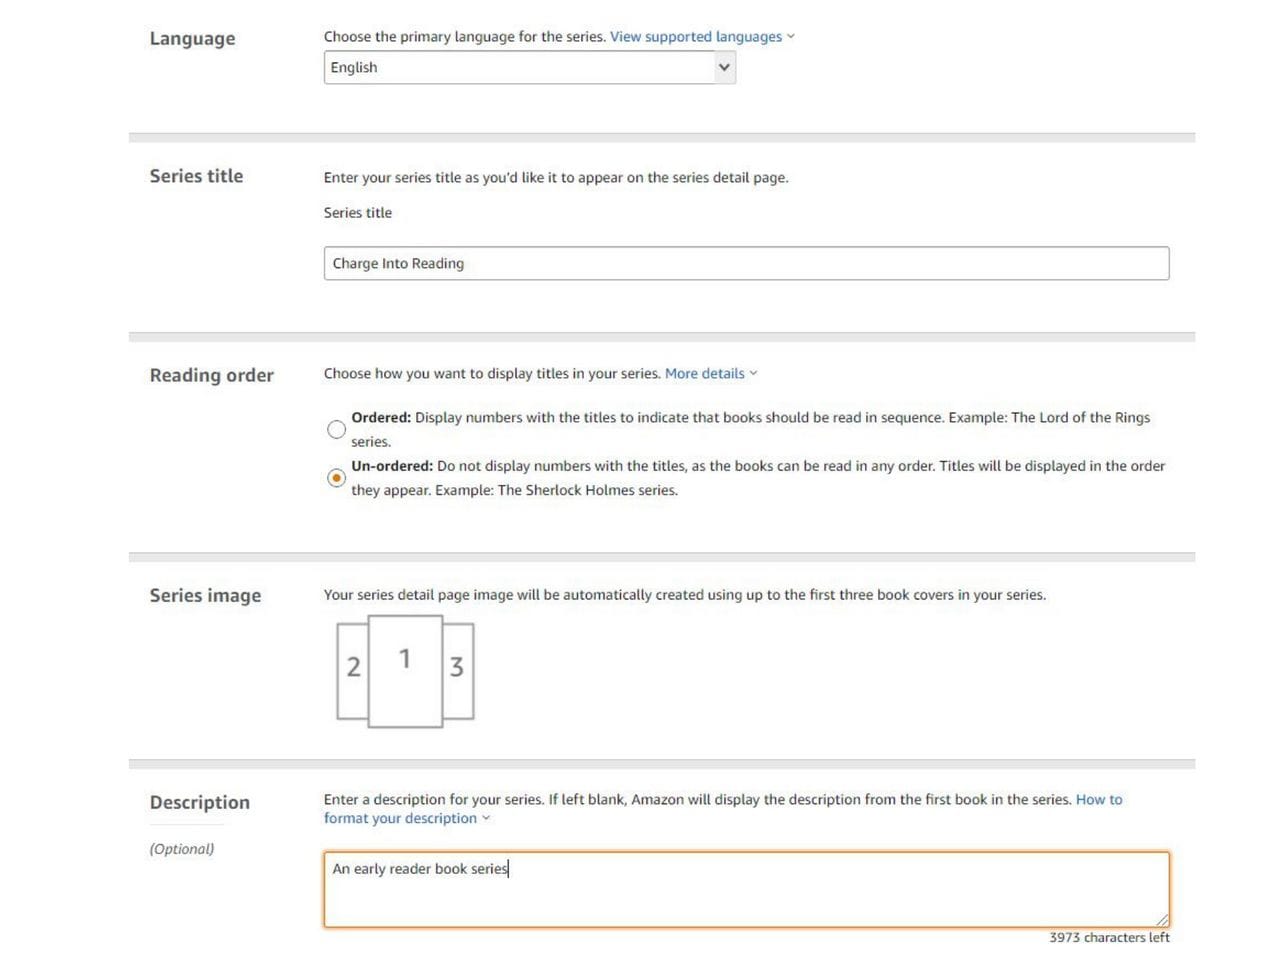
If you have not set up a series yet, you will be prompted to include information on the series, including whether the books in the series should be numbered, the name of the series, and a description of the series. Setup for a series looks like the below image:
Edition
If you are rereleasing your book as a new edition, this is the place to call out what edition of the book it is.
Pro Tip: Books with minor changes such as correcting typos or even changing the front cover do not need to be considered a new edition. Books with substantial changes do need to be considered new editions. This is often the case with nonfiction books where data has been updated.
Author and contributors
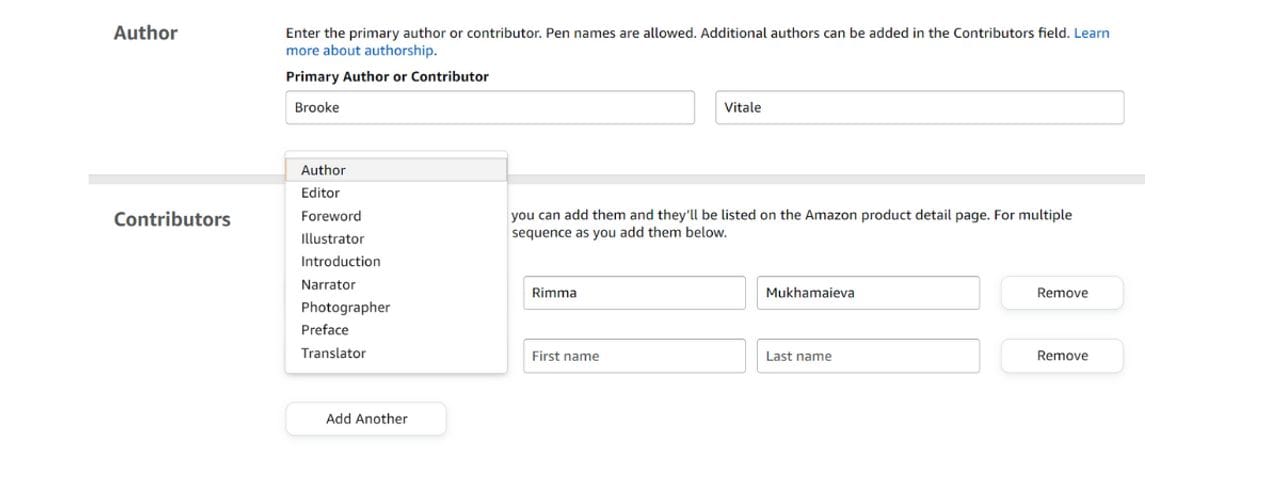
The most important name to include on a book is that of that of the author. Once you have added the author name, you may add as many other contributors as you like, including illustrator, editor, foreword author, introduction author, narrator, photographer, preface author, and translator.
Description
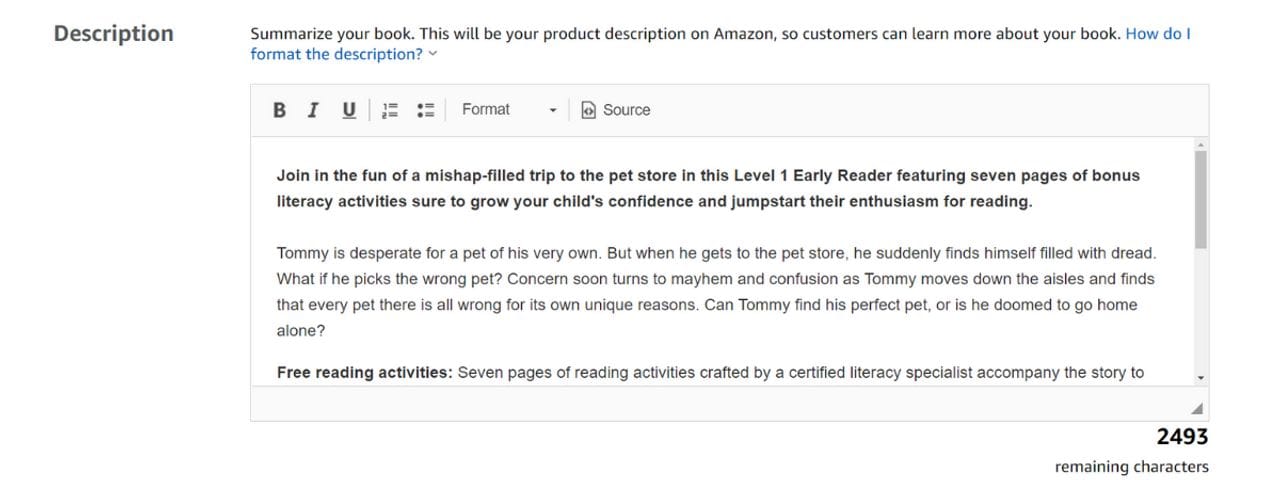
This is the big one on this page. The description field feeds out to the front page of your Amazon listing, which means that there is no more important part of publishing a book on Amazon than this field. Think carefully about your description. Make sure it tells potential buyers what a book is about. Include key selling points. And keep in succinct enough to keep readers interested. For more information on Amazon descriptions, check out my article How to Master the Book Back Cover.
In the image below, pet store is a keyword that gives the reader the setting of the book. Level 1 Early Reader is another key word, clearly describing the kind of book. The book summary draws a reader in, and key selling points are listed below the summary.
Publishing Rights
Do you own the copyright to the book, or have you secured the necessary rights? If so, click that button. If you are using a public domain work, select that button.
Keywords
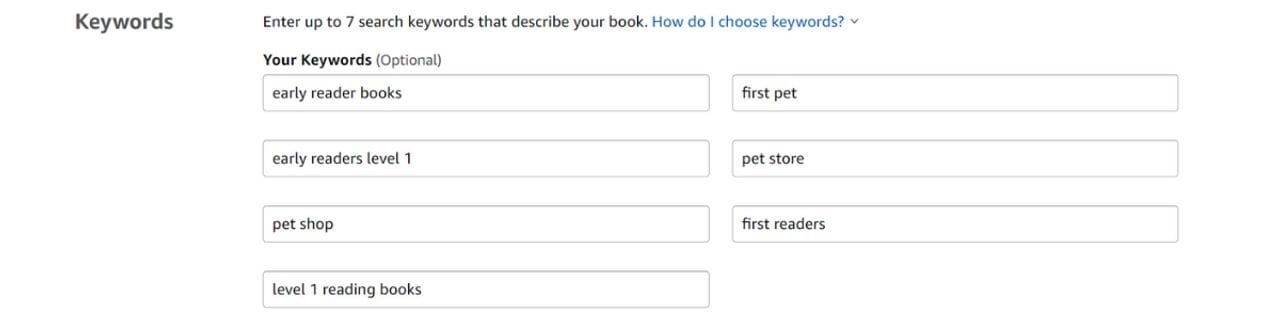
Keywords help potential buyers find your book when searching on Amazon. Do your research before choosing your keywords to make sure you are actually using words people search for.
Categories
In setting up a title to publish a book on Amazon, it is essential to select categories. These are based on BISAC codes, a set of codes used by bookstores and libraries to know how to shelve books. These codes feed into your Amazon listing, so it is important to make them as relevant as possible to help your book show up on Amazon.
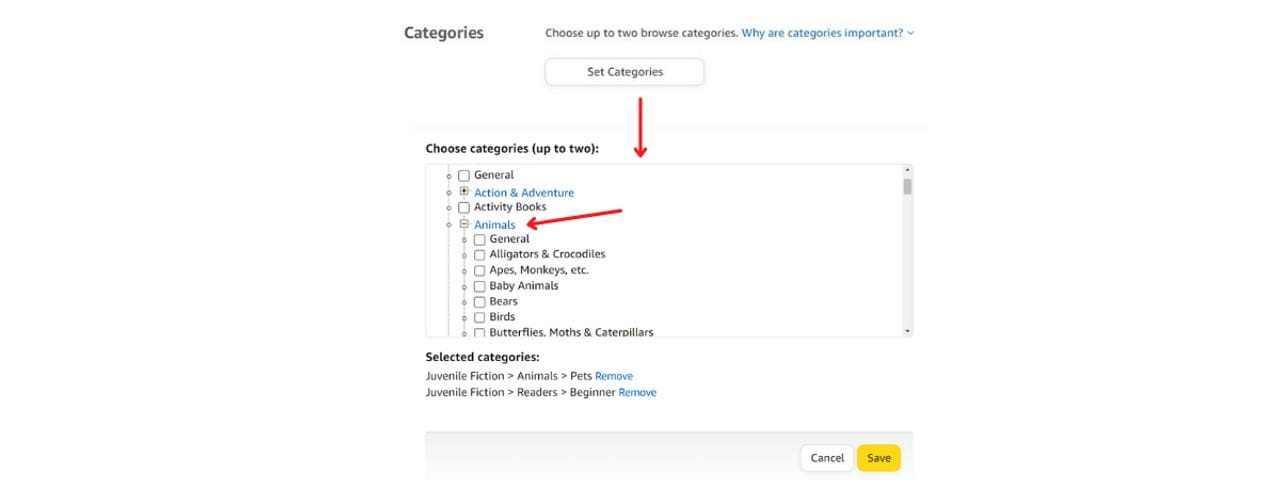
Pro Tip: At this stage, you are limited to two BISAC categories. Once your book is live, you can email KDP and ask to add up to 7 additional Amazon categories. Amazon categories are far more specific than BISAC codes, so you would do well to dig deep and request the most specific categories you can.
Pro Tip: Look up your competitor’s titles. See what categories they are using and try to match them!
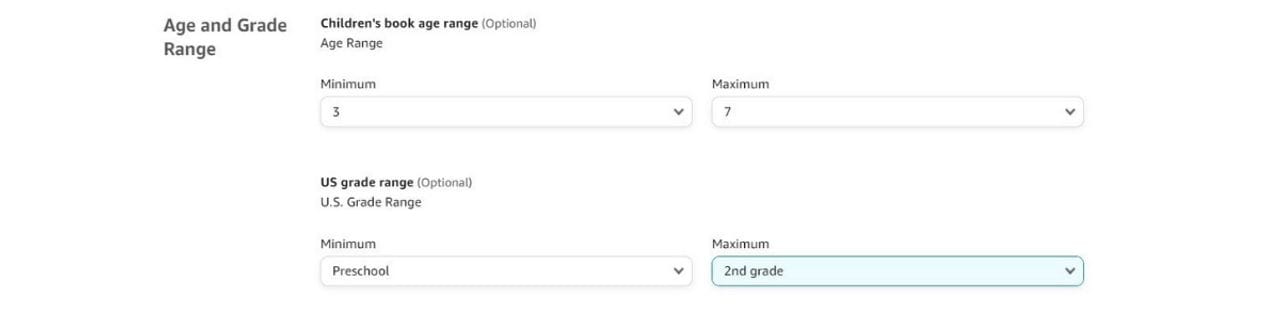
Age and grade range
If you are publishing a book on Amazon, you should know who your target audience is. This is the place to call that out. If you aren’t sure, check out my article, Target Audience.
Adult content
For paperback and hardcover books only, you will be asked if your book contains adult content.
6. Paperback content
Paperback content (or Hardcover, if that is what you are setting up) is the second page of the Amazon KDP setup process. This is where the specific publication details are entered and paper/printing specs are decided.
ISBN
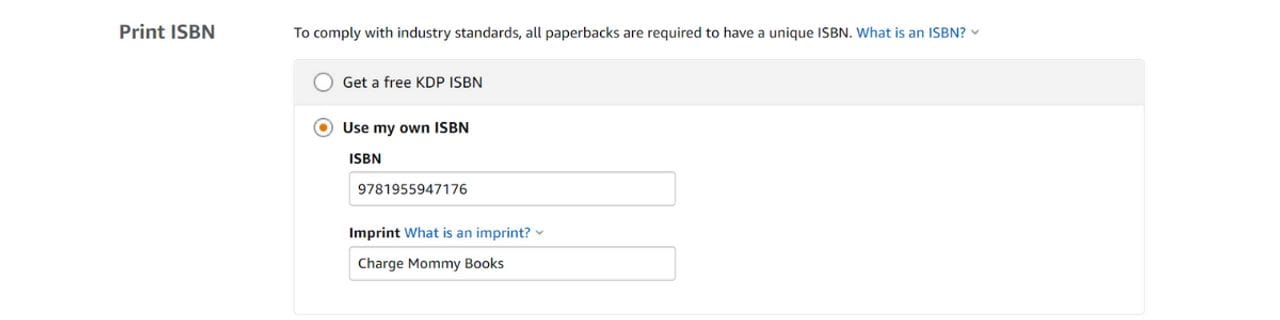
Publishing a book on Amazon comes with a choice: use a free ISBN from Amazon or use your own. Personally, I suggest using your own for a variety of reasons, not the least of which is the ability to move your book to another platform under the same ISBN. (For a full breakdown of the pros and cons of buying your own ISBNs, check out my article, How to Buy an ISBN, When to Buy an ISBN, and What ISBN Means. Whichever path you decide, this is the place to assign an ISBN to your title and to define the imprint your book is being published under.
Pro Tip: A book imprint is the company name your book will be printed under. If you have created a corporation or a name for your publishing company, this is the name that goes here.
Publication date
This is the date your book goes on-sale, and it will actually auto-fill once the book has been published, so unless you are setting up a new edition of the book, you can skip over this step.
Pro Tip: Amazon does not allow pre-orders for paperback books. Many authors get around this by publishing a hardcover book through IngramSpark (which does allow pre-orders) and linking to the paperback and eBook ISBNs.

Print options
Ink and paper type
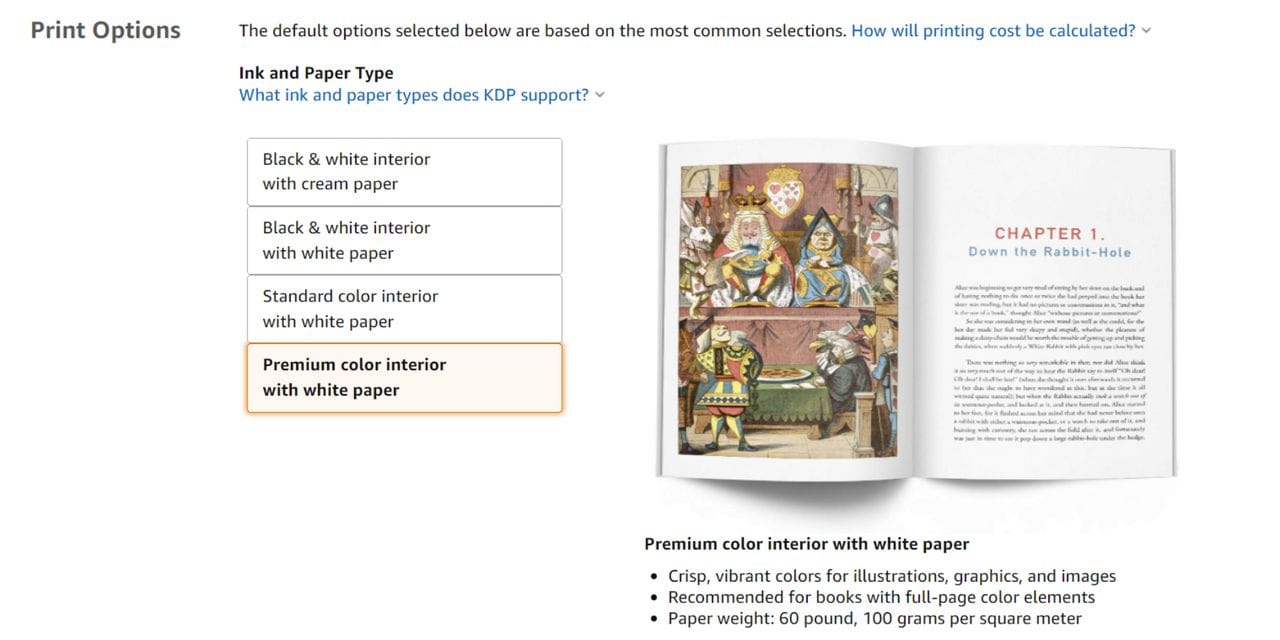
Publishing a book on Amazon comes with several choices, and one of the big ones is paper stock. At the time of writing this, there are four combinations of paper/ink offered:
- Black and white interior with cream paper: this option limits you to 1-color book printing, using only black. It is best for fiction and memoirs that do not include color art.
- Black and white interior with white paper: this option also limits you to 1-color printing. It is best for nonfiction, particularly those with black-and-white pictures, as the white paper will help them print more true-color.
Pro Tip: Avoid using white paper for novels as the stark white can get hard on the eyes after a while.
- Standard color interior with white paper: This is the more affordable of the color options, and is best for books that use more than one color in printing, but it comes with a caveat: the minimum page count for this paper is 72 pages, which makes it not suitable for picture books. This paper also has a maximum height of 11”
Pro Tip: a slightly thinner paper, this option is not advised for books with heavy color in them as the ink can easily saturate and bleed through to the other side of the page.
- Premium color interior with white paper: a slightly thicker paper, this option is recommended for books with a lot of art, especially picture books. There is no page count restriction (although publishing a book on Amazon does require a minimum of 24 pages for any book, regardless of paper.)
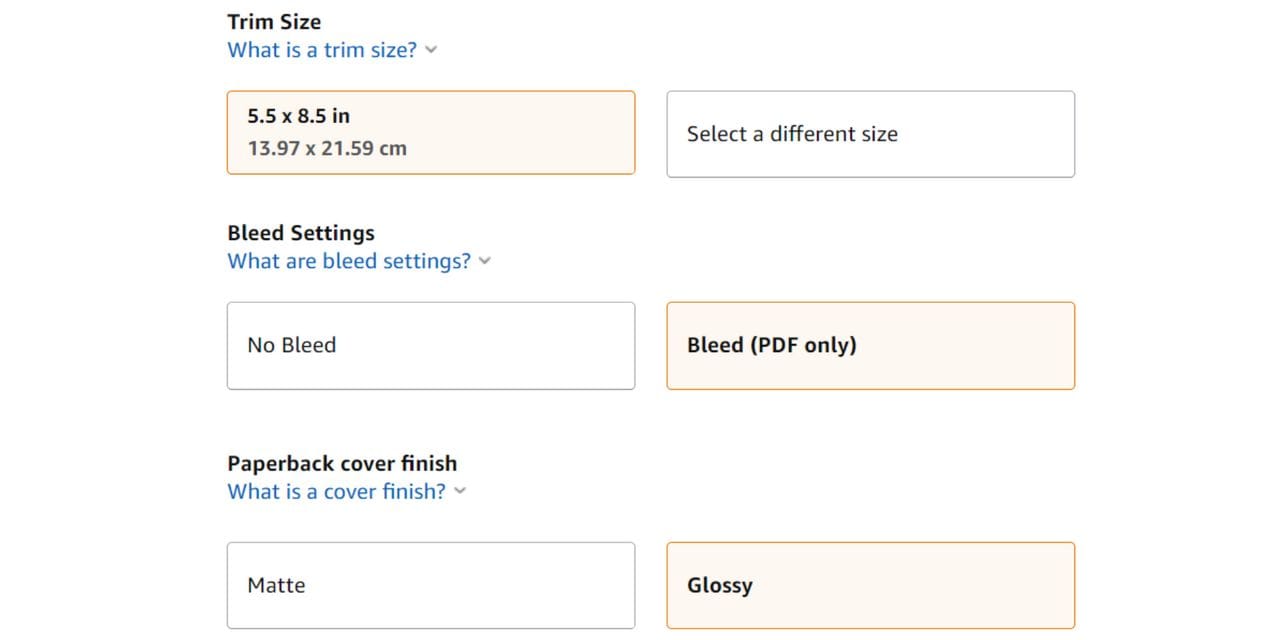
Trim size, bleed settings, and cover finish
- Trim size: By time you reach this stage, your files are complete and trim size has been decided. The only thing to be done here is select your book trim size. If the size you want is not currently showing, simply hit “select a different size” to choose the trim size you want.
- Bleed settings: If your book files are created as a PDF, they should have bleed. If you are uploading Word files (not recommended) they will not. Choose the appropriate option here.
- Cover finish: Your only options here are glossy and matte. Which you choose is really a matter of personal preference. Look at your competition and see what they are using. Do you prefer a gloss lamination on your cover or a flat cover? The choice is entirely up to you.
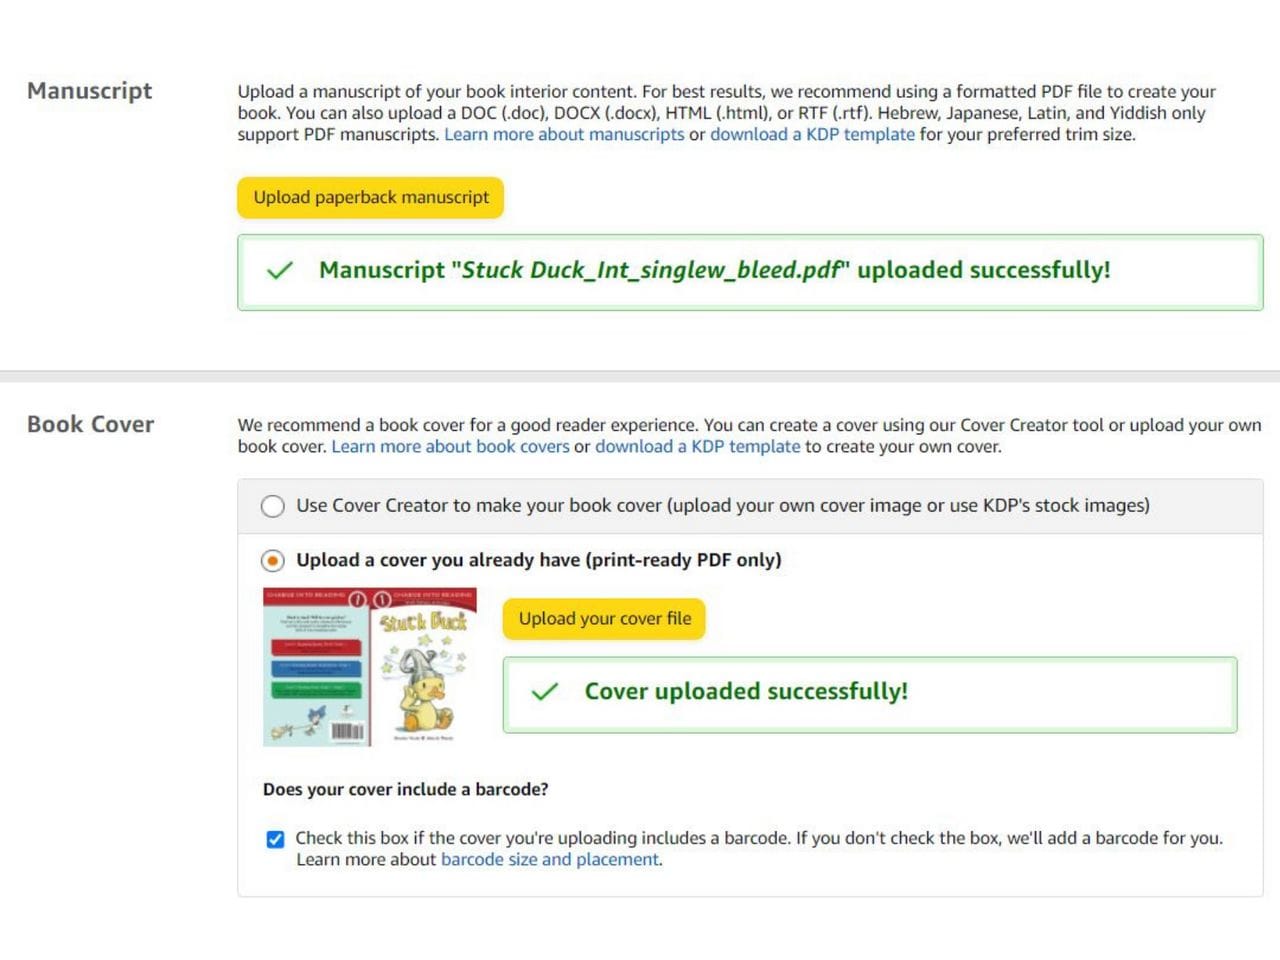
Manuscript and cover upload
Finally, the part you’ve been waiting for! A chance to upload your cover and interior. To upload images, simply click “upload manuscript” or “upload cover file” and select the correct file to upload.
Pro Tip: Once you’ve selected the manuscript, you will see a message pop up that says the book is loading. This can take some time, so be patient. DO NOT refresh the page.
Once the manuscript and cover have successfully been uploaded, you will receive a notification under each that says the upload was successful.
Book Preview
Amazon will not let you move on to the next step without previewing your book (whether eBook or physical book). And that’s a good thing because the book preview is your chance to see what problems the automatic reviewer caught. If the book has been properly designed, you should be fine and you will be able to approve your book. But if not, the previewer will call out issues that need to be fixed before proceeding. Take a look at the example below, which shows issues with the file called out on the left of the page.
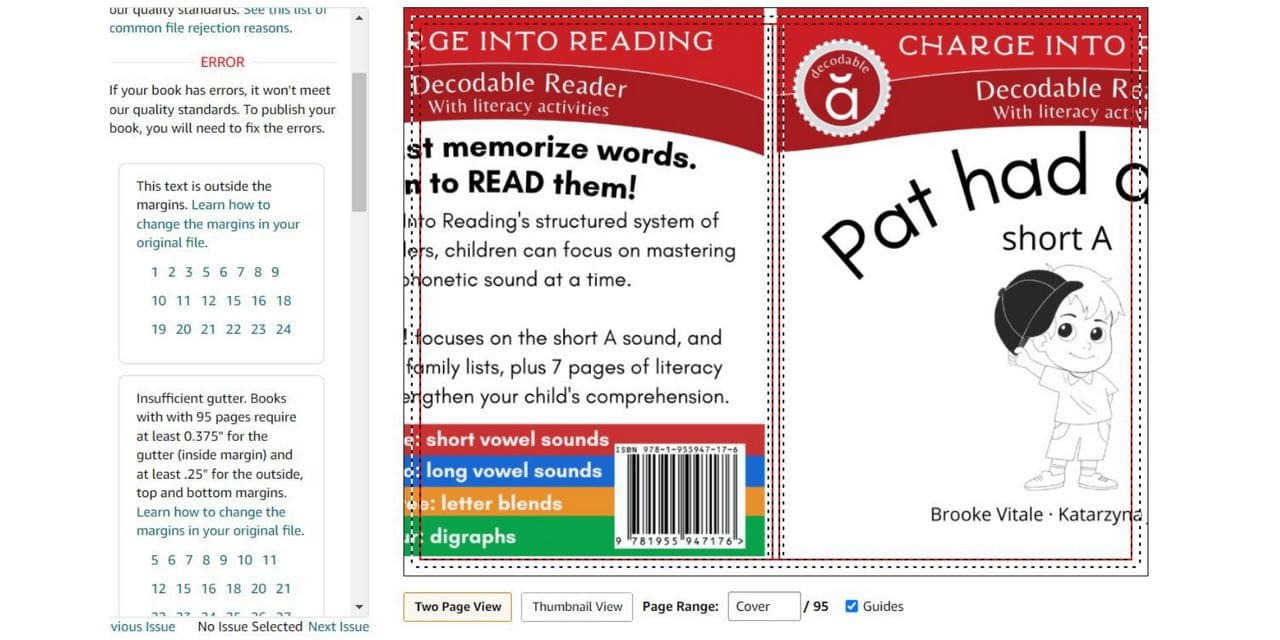
If there are problems to be fixed, you will need to update your book files and re-export before uploading a new file.
If the files are fine, you can approve and move on to pricing.
7. Paperback rights and pricing
This is the money page—the place where you decide where, for how much, and how much you'll get on each book sold.
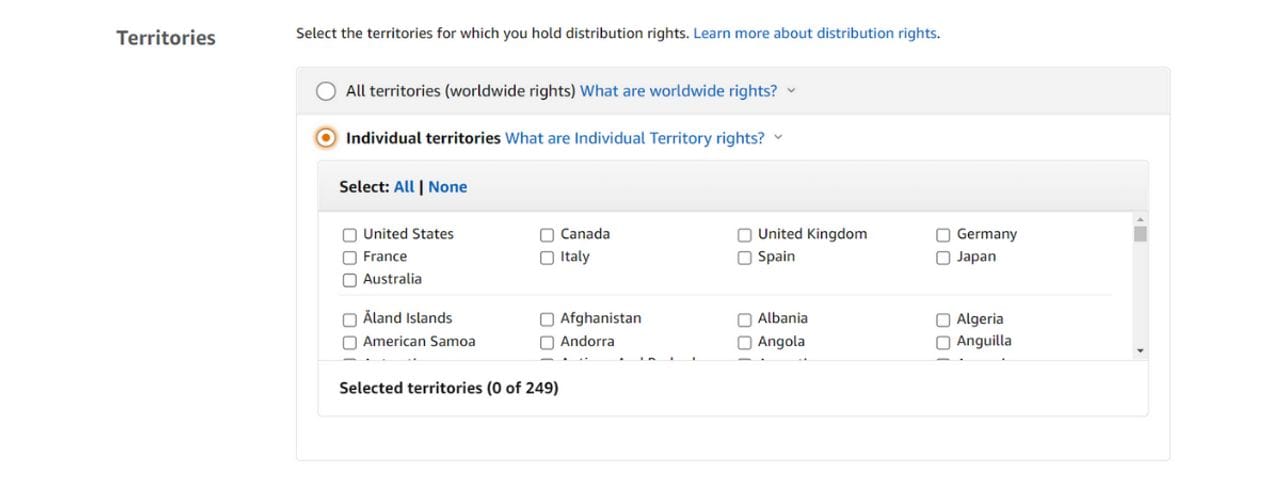
Territories
Before you can set pricing, you need to decide where you want to sell your book. If you want to sell in all Amazon territories, select all territories. If you only have rights in certain countries (as may sometimes be the case when photographs are purchased or art is commissioned) select the countries where you have the contractual rights to sell.
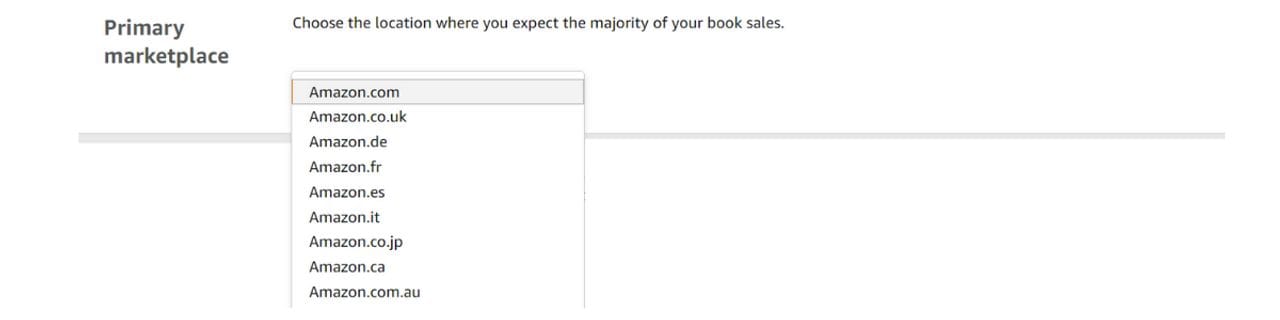
Primary marketplace
The primary marketplace is where you expect to sell the bulk of your books (and is most likely where you live).
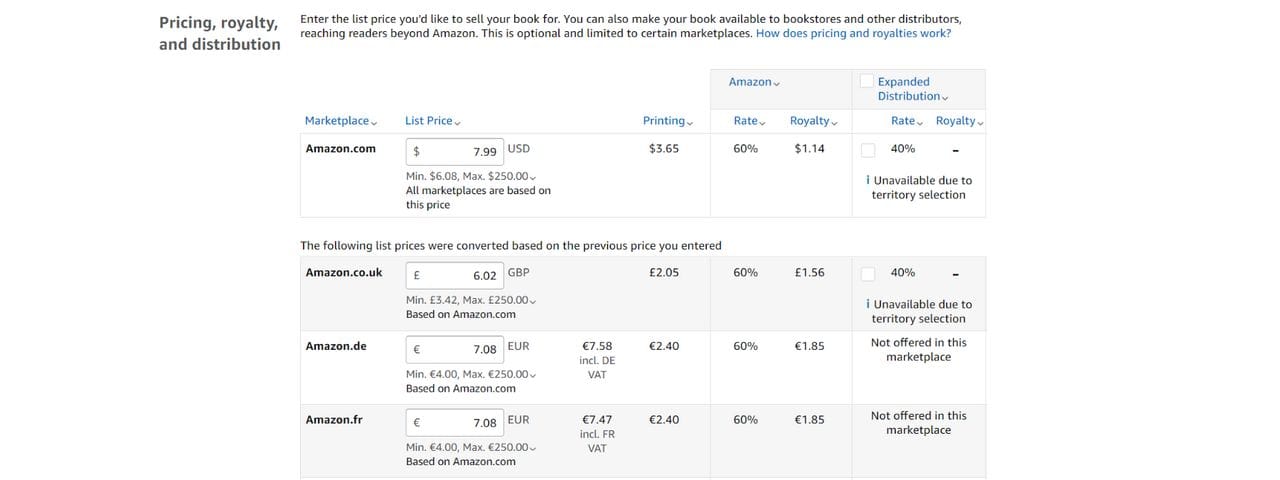
Pricing, royalty, and distribution (paperback)
Starting with your primary marketplace, set your book price. I suggest playing with it a bit to check how the amount of royalties you receive changes. Once you set a price for your primary market, the rate for other territories will auto-fill, but you can change these manually if you wish to charge more or less in a particular country. Not sure what to charge? Check out my article, How Much Should You Charge for Your Self-Published Book?
At this point, you will also need to decide if you want to enroll in Expanded Distribution, a program that allows your book to be distributed to physical retailers, other online retailers, and libraries.
Pro Tip: Few physical retailers are willing to carry books published by Amazon, so consider whether accepting the reduced royalty rate that comes with Expanded Distribution is worthwhile.
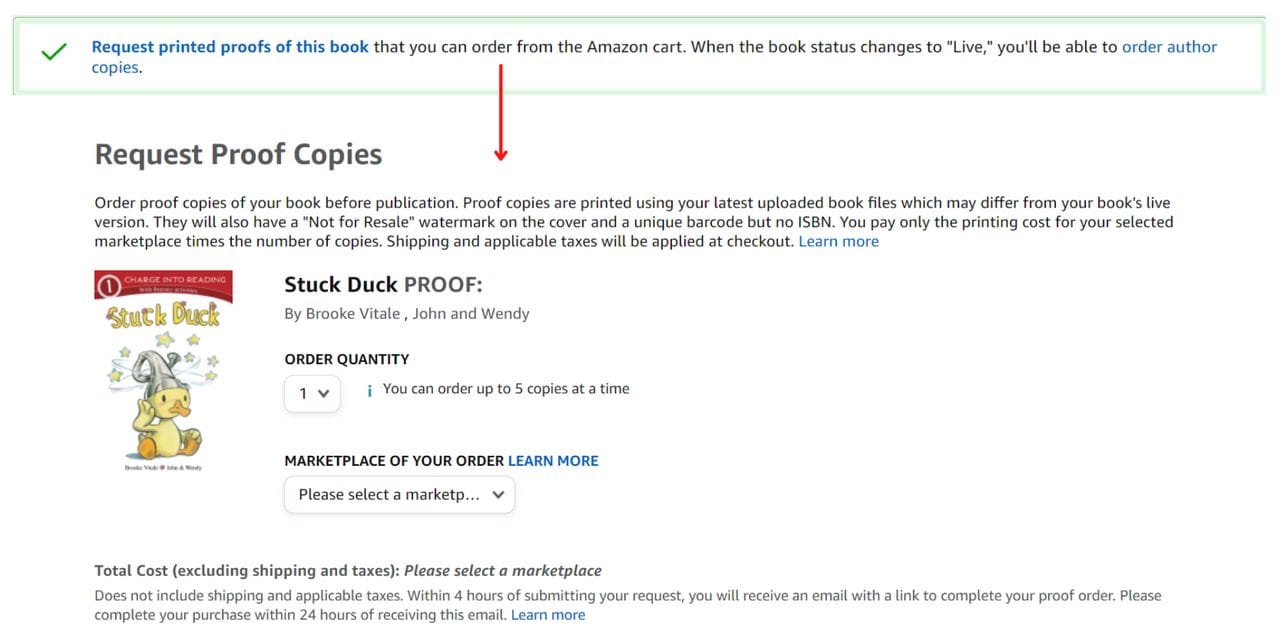
Ordering Proof Copies
Once your book is uploaded and all of the payment fields are filled out, you are ready to publish. But don’t be so quick to hit that button. Publishing a book on Amazon comes with a big advantage: the opportunity to order proof dummies. A proof dummy is a printed version of a big with a big “Not for resale” printed across the front of it. Ordering dummies allows you to check that everything is right with the file and that the book came out the way you expected it to. If you’re in a rush, you can skip this step and order an author copy, but if you have time, get the printed proof to confirm everything looks right.
8. eBook setup
Setting up an eBook is essentially the same as setting up a paperback, and most of the information will autofill if you have already created a hardcover or paperback book. But there are a few key differences.
Pre-order
This appears on the eBook details page, and is a feature only available for eBooks. A preorder enables readers to buy the book in advance and receive it on the day it goes on sale. If you have a marketing campaign set around your book and want people to be able to order in advance, this is for you. If you are ready to go on sale, there is no need to set up a preorder.
Pro Tip: Many people prefer to set eBooks as free for the first few days of publication to drive book reviews. It is important to note that you will need 24 hours’ notice to set up a book for a free day, and one cannot be set until a book is live. So if you plan a pre-order, make sure the book goes on sale a day before you want to set it for a free eBook day.

Digital rights management
This appears on the eBook content page. Digital rights management, or DRM, is meant to protect your book from theft, and enabling this is never a bad idea.
eBook ISBN
This also appears on the eBook content page. Amazon assigns each product sold an ASIN—a unique 10-digit code, which means that eBooks don't need ISBNs. That being said, I personally prefer to give eBooks their own unique ISBNs as well so that I can move them across platforms more easily. Whether you choose to do so is entirely up to you.
KDP Select
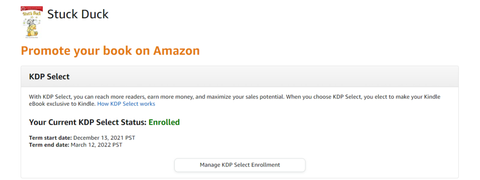
This appears on the eBook pricing, royalty, and distribution page., and it's a big one. So, what is KDP Select? KDP Select is a program Amazon offers authors in exchange for exclusive rights to sell their eBook through the Kindle store only. Enrollment in Kindle Select lasts 90 days, and can then be renewed for additional 90 day periods. It prohibits authors from publishing or selling eBooks on other platforms, but also offers advantages such as free eBook days, price promotions, and enrollment in KindleUnlimited. Whether you choose to enroll is up to you, and you can always choose to enroll later on if you change your mind.
Pro Tip: Try enrolling for the first 90 days to take advantage of free eBook days that help drive book reviews!
eBook pricing and royalty
With eBooks, you get to choose your royalty: 35% or 70%. It seems like a no-brainer, but the 70% royalty charges a fee for each book sold, based on file size. The 35% royalty charges no fees. So before you make a final decision, do the math and make sure that the extra you earn in royalties at 70% outweighs the fees you will pay.
Pro Tip: On eBooks, Amazon offers its highest royalty (70 percent) on books priced between $2.99 and $9.99, so it is worth pricing within this range. All books falling outside of this range automatically receive a 35% royalty.
9. Publish a book on Amazon
Once everything is done and approved, hit that publish button! It can take 2-3 days for a book to go live, but you will receive an email notification once it does (or if there is a problem with the file that needs to be fixed.) And that’s it! Your quest to publish a book on Amazon is done! But . . . your journey isn’t!
10. Set up Amazon marketing
You published a book on Amazon. Congratulations. But your work isn't done yet. There are still more pieces to setting up a book properly. Let's take a look at the big ones.
Amazon book categories
As noted above, putting your book in the most focused categories you can is key to success. This will help drive keywords and can earn you the coveted best-seller badge on Amazon. Categories are listed on your book’s product description, as seen below.
To find the best product categories, begin by searching for a relevant topic. Along the left side of the page, you will see categories. Dig down in each category until you find the one that is right for your book. Once you decide which categories you’d like to add, email KDP support through their contact page and ask them to add the additional categories to each ASIN.
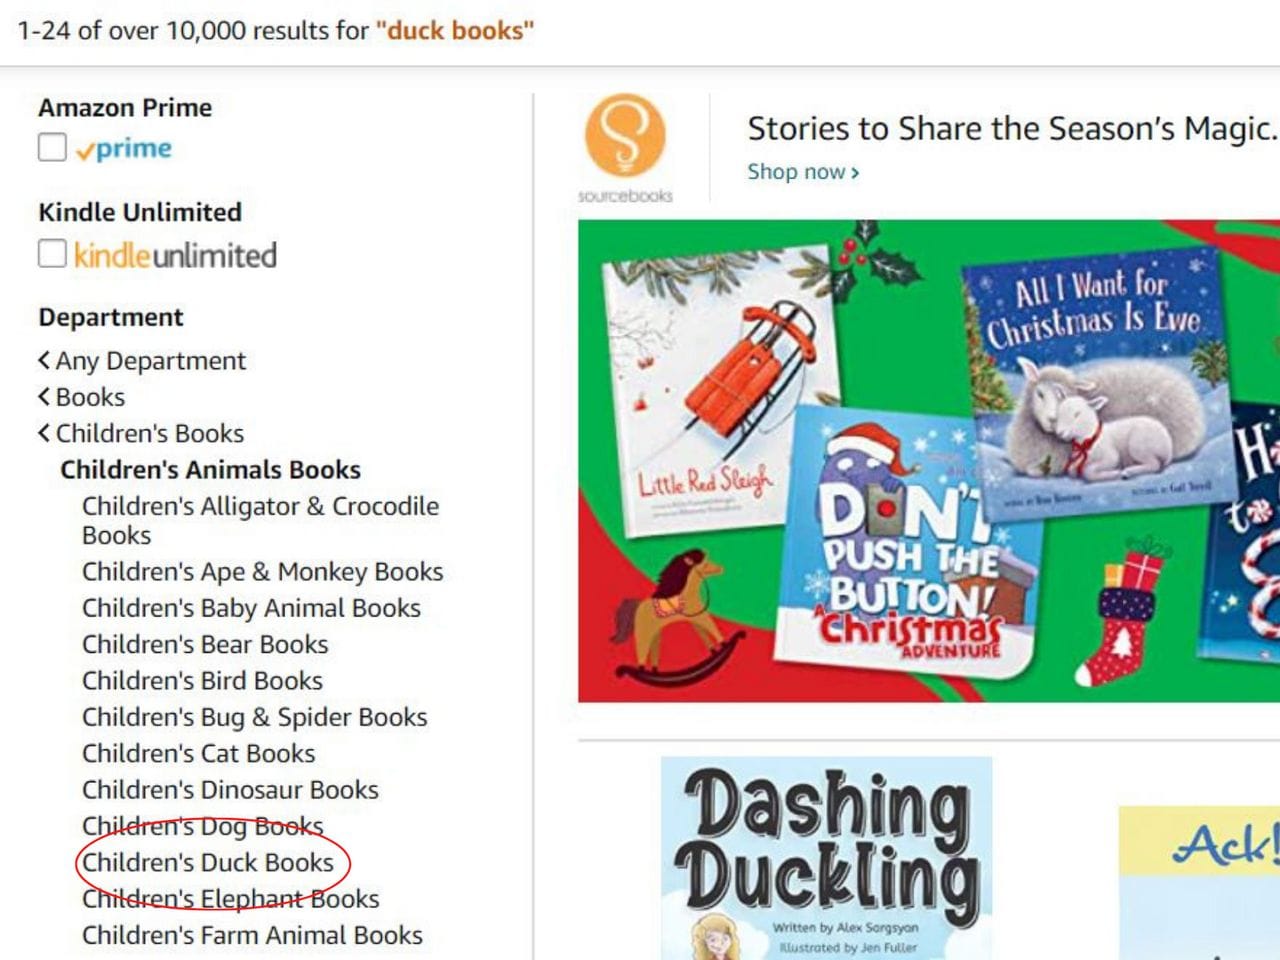
Pro Tip: eBooks and physical books use different categories, so you will need to supply the correct category string for each set of books. For example,a physical book category would look like this: Books-> Children’s Books -> Children’s Animal Books -> Children’s Duck Books
An eBook category would look like this: Kindle eBooks -> Children’s eBooks ->Animals -> Ducks and other waterfowl
Look inside the book
The look inside the book feature on Amazon will appear after a few days, but the default is only a few pages—usually the first few. Email KDP support and ask them to increase the percentage of the book shown. eBooks can show up to 45 percent of the book while physical books can show up to 80 percent. Be sure to supply the ASINs for each book you want adjusted.
Pro Tip: Because my books include literacy activities at the end, I specifically ask that the look inside include pages from the beginning and the end. If you need a similar split, be sure to ask for it. They cannot guarantee specific pages, but they can usually accommodate general requests.
Amazon A+ Content
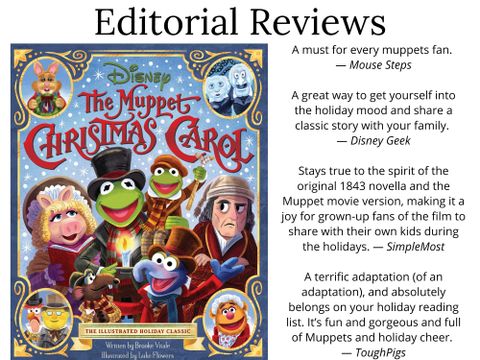
Amazon A+ Content is enhanced marketing materials available to KDP users. The image below is an example of A+ Content.
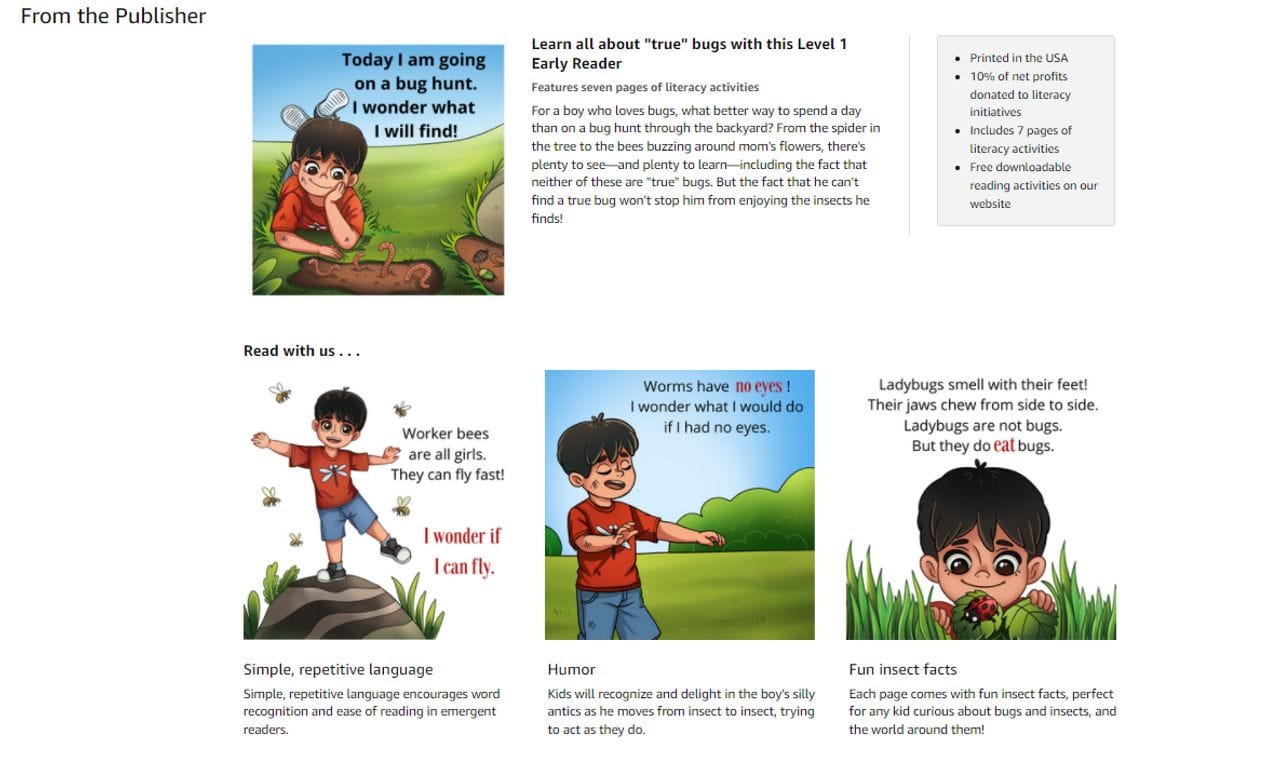
Once your book is live, be sure to go set up your A+ Content to drive extra sales. For more information and examples of A+ Content, check out my article, Amazon A+ Content: Creation, Best Practices, and Examples.
And remember, your free book days and promotions, ads, and sales can all be tracked from your KDP dashboard, so it’s a good place to visit often!